阅读更多
1 Installation
1.1 CentOS
1 | # --step 1: install dependent softwares |
1.2 Ubuntu
Install Docker Engine on Ubuntu
1.3 MacOS (Apple Chip)
Colima runs a minimal Linux VM using Lima under the hood. Docker Engine runs inside that VM. The Docker CLI talks to it through a Unix socket just like Docker Desktop would.
1 | brew install docker |
1.3.1 colima
Colima (short for Container on Lima) is a fast, lightweight Docker and Kubernetes runtime for macOS and Linux that provides a Docker-compatible environment using a virtual machine under the hood — specifically Lima (Linux virtual machines).
It’s often used as a drop-in replacement for Docker Desktop — especially after Docker Desktop introduced licensing changes in 2022.
Commands:
colima statuscolima listcolima sshcolima start --cpu 6 --memory 8 --disk 100colima stopcolima start --edit
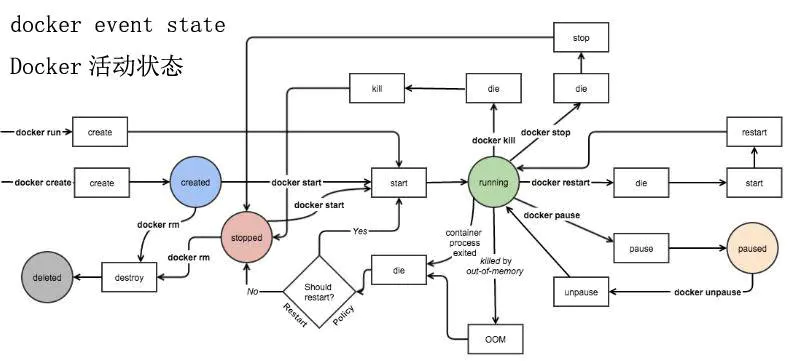
2 Container Lifecycle
3 Filesystem
3.1 overlay2
Example OverlayFS Usage [duplicate]
4 Build Image
Write Dockerfile
FROM: Specifies a base image- In most cases, a valid Dockerfile starts with a
FROMinstruction. FROMmust be the first non-comment instruction in a Dockerfile.FROMcan appear multiple times in a Dockerfile to create multi-stage builds.- If no tag is specified,
latestwill be used as the default version of the base image.
- In most cases, a valid Dockerfile starts with a
MAINTAINER: Specifies the author of the image- (Note: This instruction is deprecated. Use a
LABELinstead to define metadata such as the maintainer.)
- (Note: This instruction is deprecated. Use a
RUN: Executes commands during image buildRUNinstructions create intermediate image layers and are persisted in the final image.- Layered
RUNinstructions support Docker’s core philosophy of image versioning and reproducibility. RUNcommand cache is not invalidated automatically in the next instruction. For example, a cachedRUN apt-get dist-upgrade -ymight be reused.- Use the
--no-cacheflag to force disable caching.
ENV: Sets environment variables inside the Docker container- Environment variables set by
ENVcan be viewed using thedocker inspectcommand. - These variables can also be overridden at runtime using
docker run --env <key>=<value>.
- Environment variables set by
ARG: Defines environment variables that are available only during the image build- Available only during
docker build, not persisted in the final image. - Values can be passed with
--build-arg <key>=<value>when building the image.
- Available only during
USER: Changes the user under which the container runs- By default, Docker containers run as the
rootuser.
- By default, Docker containers run as the
WORKDIR: Sets the working directory for instructions that follow- The default working directory is
/. Whilecdcan be used withinRUN, it only affects the currentRUNinstruction. WORKDIRchanges are persistent and apply to all following instructions, so you don’t need to repeatWORKDIRfor each command.
- The default working directory is
COPY: Copies files or directories from<src>on the host to<dest>in the container<src>must be a path relative to the build context, or a file/dir.<dest>must be an absolute path inside the container.- All copied files/folders are assigned UID and GID. If
<src>is a remote URL, the destination file permissions default to 600.
ADD: Similar toCOPY, but with extended features<src>can be a file, directory, or a remote URL.<dest>is an absolute path inside the container.- Files are assigned UID and GID. If
<src>is a remote URL, permissions default to 600. ADDcan also auto-extract local tar archives, whichCOPYcannot.
VOLUME: Creates a mount point for external storage (host or other containers)- Commonly used for databases or persistent data.
EXPOSE: Informs Docker that the container listens on the specified port- Does not publish the port itself; it only serves as documentation or for use with Docker networking.
CMD: Provides default command to run when the container starts- Only one
CMDinstruction is allowed per Dockerfile; if multiple are specified, only the last one is used. - Can be overridden by passing a command when running the container:
docker run $image $override_command.
- Only one
ENTRYPOINT: Configures a container to run as an executable- The default
ENTRYPOINTis/bin/sh -c, but there is no defaultCMD. - For example, in
docker run -i -t ubuntu bash, the defaultENTRYPOINTis/bin/sh -cand theCMDisbash. - CMD essentially acts as arguments to ENTRYPOINT.
- The default
ONBUILD: Defers the execution of instructions- These instructions are triggered when the resulting image is used as a base image in another build.
- Each ONBUILD instruction is triggered only once.
4.1 Relative Path in a Dockerfile
In Dockerfiles, relative paths (like ./myfile.txt or src/) are always relative to the build context. The build context is the directory you specify when you run (Here, the <path-to-context> is the build context.):
docker build -t <image> <path-to-context>
Docker will throw an error if COPY or ADD refers to something outside the build context, like ../secret.txt.
4.2 Demo
1 | mkdir -p friendlyhello |
5 Frequently-Used Images
5.1 alpine
Alpine Linux is a lightweight Linux distribution. Unlike typical Linux distributions, Alpine uses musl libc and BusyBox to reduce system size and runtime resource usage. Alpine Linux provides its own package manager: apk.
Here’s an example of how to build a Docker image with bash.
1 | FROM alpine:3.10.2 |
5.2 jib
1 | <plugin> |
5.3 minio
1 | docker run -d --name minio \ |
1 | mc alias set local http://localhost:9000 admin password123 |
Client tools: aws
aws s3 --endpoint http://127.0.0.1:21900 ls s3://my_bucket/file.txt
6 Docker Compose
6.1 Install
1 | sudo curl -L "https://github.com/docker/compose/releases/latest/download/docker-compose-$(uname -s)-$(uname -m)" -o /usr/local/bin/docker-compose |
6.2 Usage
docker-compose [ -f <compose_file> ] [-p <project_name>] updocker-compose [ -f <compose_file> ] [-p <project_name>] up -ddocker-compose [ -f <compose_file> ] [-p <project_name>] downdocker-compose [ -f <compose_file> ] [-p <project_name>] startdocker-compose [ -f <compose_file> ] [-p <project_name>] stopdocker-compose [ -f <compose_file> ] [-p <project_name>] restartdocker-compose [ -f <compose_file> ] [-p <project_name>] rmdocker-compose [ -f <compose_file> ] [-p <project_name>] psdocker-compose [ -f <compose_file> ] [-p <project_name>] exec -it <service_name> bashdocker-compose [ -f <compose_file> ] [-p <project_name>] configdocker-compose [ -f <compose_file> ] [-p <project_name>] config --services
6.3 Tips
6.3.1 Find docker-compose information for given docker container
docker inspect <container_id> | grep 'com.docker.compose'
7 Tips
- Start and keep a container running
- Run a program that doesn’t exit:
docker run -dit xxx:v1 - Start with an interactive bash shell:
docker run -it 9a88e0029e3b /bin/bash
- Run a program that doesn’t exit:
- Copy files between host and Docker container
docker cp [OPTIONS] CONTAINER:SRC_PATH DEST_PATH|-docker cp [OPTIONS] SRC_PATH|- CONTAINER:DEST_PATH
- Open a
D-Bus connectiondocker run -d -e "container=docker" --privileged=true [ID] /usr/sbin/init- The container’s
CMDshould include/usr/sbin/init
- Start and stop containers:
docker start <container-id>docker stop <container-id>
- Execute commands in a specific container
docker exec -ti my_container /bin/bash -c "echo a && echo b"
- View
pidandipof a docker containerdocker inspect <container-id> | grep Piddocker inspect -f '{{.State.Pid}}' <container-id>docker inspect -f '{{range .NetworkSettings.Networks}}{{.IPAddress}}{{end}}' <container-id>
- Delete a specific tag
docker rmi <repository>:<tag>— do not use the image ID
- List all image IDs
docker images -q
- Save an image to a file and load from a file
docker save -o alpine.tar alpine:3.10.2docker load < alpine.tar
- Set timezone
docker run -e TZ=Asia/Shanghai ...
- Set kernel parameters (requires privileged mode)
- When writing the Dockerfile, add the kernel parameter changes to the
CMD(you can’t modify them withRUNsince kernel files are read-only during build) - Use privileged mode when starting:
docker run --privileged
- When writing the Dockerfile, add the kernel parameter changes to the
- Use docker commands inside a container
--privileged: use privileged mode-v /var/run/docker.sock:/var/run/docker.sock: mount the Docker socket file-v $(which docker):/bin/docker: mount the Docker CLI binary
- Join the network namespace of another container when starting
docker run [--pid string] [--userns string] [--uts string] [--network string] <other options>docker run -d --net=container:<existing container id> <image id>
- After deleting the Docker CLI, Docker’s working directory (including images) still exists. To completely remove it:
rm -rf /var/lib/docker
- View image build history:
docker history <img> - View image details:
docker inspect <img> - Check container resource usage:
docker stats <container> - Clean up unused images:
docker system prune -a - Grant a regular user permission to use
docker:sudo usermod -aG docker username
7.1 Modify docker storage path
默认情况下,docker相关的数据会存储在/var/lib/docker。编辑配置文件/etc/docker/daemon.json(没有就新建),增加如下配置项:
1 | { |
然后通过systemctl restart docker重启docker即可
7.2 Modify Mirror Address
编辑配置文件/etc/docker/daemon.json(没有就新建),增加如下配置项:
1 | { |
然后通过systemctl restart docker重启docker即可
7.3 Run docker across platform
默认情况下,docker是不支持--platform参数的,可以通过修改/etc/docker/daemon.json,添加如下配置项后,重启docker,开启该功能
1 | { |
如果我们在x86的平台上运行arm64的docker镜像,会得到如下错误信息
1 | docker run --platform linux/arm64 --rm arm64v8/ubuntu:18.04 uname -a |
此时,我们可以借助跨平台工具qemu,下载地址。该方法对内核版本有要求,貌似要4.x以上,我的测试环境的内核版本是4.14.134
1 | # 下载qemu-aarch64-static |
docker run --rm --privileged multiarch/qemu-user-static:register是向内核注册了各异构平台的binfmt handler,包括aarch64等等,这些注册信息就包括了binfmt handler的路径,比如/usr/bin/qemu-aarch64-static等等,注册信息都在/proc/sys/fs/binfmt_misc目录下,每个注册项都是该目录下的一个文件。实际的qemu-xxx-static文件还得手动放置到对应目录中才能生效
Steps for ubuntu:
1 | sudo apt-get update |
7.4 Docker Image Prune Tools - dockerslim
1 | docker-slim build --http-probe=false centos:7.6.1810 |
裁剪之后,镜像的体积从202MB变为3.55MB。但是裁剪之后,大部分的命令都被裁剪了(包括ls这种最基础的命令)
7.5 Be Aware of Running as a Container
一般来说,如果运行环境是容器,那么会存在/.dockerenv这个文件
7.6 Build Image from Container
保留镜像原本的layer,每次commit都会生成一个layer,这样会导致镜像越来越大:
1 | docker commit <container-id> <new_image> |
将容器导出成单层的镜像:
1 | docker export <container-id> -o centos7.9.2009-my.tar |
7.7 Setup Http Proxy
Add file /etc/systemd/system/docker.service.d/http-proxy.conf with following content:
1 | [Service] |
Check and restart
1 | systemctl daemon-reload |
7.8 Access Host Ip from Container
The host has a changing IP address, or none if you have no network access. We recommend that you connect to the special DNS name host.docker.internal, which resolves to the internal IP address used by the host.
7.9 How to delete exited containers
1 | docker ps -a -f status=exited -q | xargs docker rm -f |
7.10 How to create container with host user
1 | docker run --user $(id -u):$(id -g) -v /etc/passwd:/etc/passwd |
7.11 Find containers using network
1 | docker network inspect <ns-name> |
7.12 How to map ports with localhost only
1 | docker run -dit -p 127.0.0.1:3306:3306 -e MYSQL_ROOT_PASSWORD='Abcd1234' mysql:5.7.37 mysqld --lower_case_table_names=1 |
7.13 Config Path
- Client:
~/.docker/config.json - Daemon:
/etc/docker/daemon.json
8 FAQ
8.1 K8S Env docker error
在k8s环境中,若容器运行时用的是docker,那么该docker会依赖containerd,当containerd不正常的时候,docker也就不正常了。恢复containerd的办法:将/var/lib/containerd/io.containerd.metadata.v1.bolt这个文件删掉
8.2 read unix @->/var/run/docker.sock: read: connection reset by peer
- 没有权限
- 多套
docker共用了同一个/var/run/docker.sock套接字文件,可以用lsof -U | grep docker.sock查看。默认情况下只有2个记录,一个是systemd的,另一个是dockerd的
9 Reference
- Docker Hub
- Docker历史版本下载
- Docker
- Docker Command
- Docker 教程
- Docker 原理篇
- 深入分析Docker镜像原理
- Docker之Dockerfile语法详解
- docker容器与虚拟机有什么区别?
- docker与虚拟机性能比较
- RunC 简介
- Containerd 简介
- 从 docker 到 runC
- jib
- 探讨Docker容器中修改系统变量的方法
- What is the difference between CMD and ENTRYPOINT in a Dockerfile?
- Sharing Network Namespaces in Docker
- x86机器上运行arm64 docker
- github-qemu
- 跨平台构建 Docker 镜像
- 跨平台构建 Docker 镜像新姿势,x86、arm 一把梭
- QEMU和KVM的关系
- dockerslim
- 第三章 Docker容器的生命周期