阅读更多
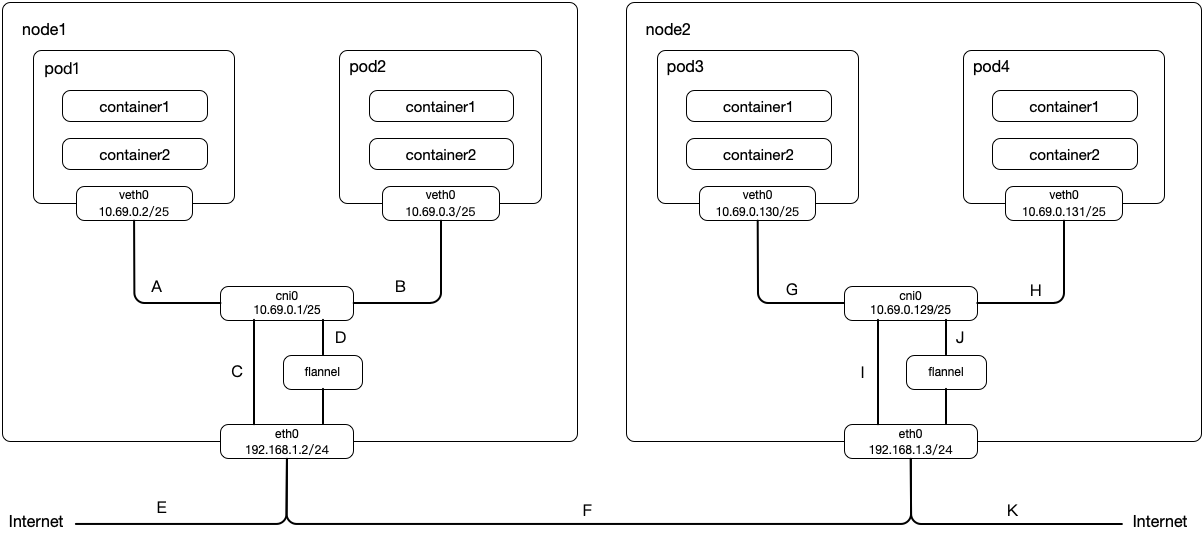
pod的网络类型可以是容器网络也可以是主机网络,这里仅讨论容器网络这一类型的pod
同主机pod互访 :A->Bpod访问外网 :A->C->E跨主机pod互访 :A->D->F->J->H
该模式最主要的特征是:流量重定向工作是由kube-proxy完成的,也就是在用户空间完成的 kube-proxy会监听Service的创建和删除,当发现新的Service创建出来后,kube-proxy会在localhost网络开启一个随机端口(记为loPort)进行监听,同时向iptable写入路由规则(Cluster IP:Port->localhost:loPort),即将流向Service的流量转发到本地监听的端口上来kube-proxy会监听Endpoint的变更,并将Service及其对应的Pod列表保存起来
在Pod中访问Service的时序图如下
该模式最主要的特征是:流量重定向的工作是由iptable完成的,也就是在内核空间完成的 kube-proxy会监听Service、Endpoint的变化,并且更新iptable的路由表更高效、安全,但是灵活性较差(当某个Pod没有应答时,不会尝试其他Pod)
在Pod中访问Service的时序图如下
与iptable模式类似,ipvs也是利用netfilter的hook function来实现的,但是ipvs利用的是哈希表,且工作在内核空间,因此效率非常高,同时ipvs还支持多种负载均衡算法
rr: round-roginlc: least connectiondh: destination hashingsh: source hashingsed: shortest expected delaynq: never queue
在以上任何一种模式中,来自Cluster IP:Port的流量都会被重定向到其中一个后端Pod中,且用户不感知这些过程
定义可以参考源码proxier.go
1
2
3
4
5
6
7
8
9
10
11
12
13
14
15
16
17
18
19
20
21
22
23
24
25
const ( kubeServicesChain utiliptables.Chain = "KUBE-SERVICES" kubeExternalServicesChain utiliptables.Chain = "KUBE-EXTERNAL-SERVICES" kubeNodePortsChain utiliptables.Chain = "KUBE-NODEPORTS" kubePostroutingChain utiliptables.Chain = "KUBE-POSTROUTING" KubeMarkMasqChain utiliptables.Chain = "KUBE-MARK-MASQ" KubeMarkDropChain utiliptables.Chain = "KUBE-MARK-DROP" kubeForwardChain utiliptables.Chain = "KUBE-FORWARD" kubeProxyCanaryChain utiliptables.Chain = "KUBE-PROXY-CANARY" )
KUBE-SERVICES :所有的service(无论是ClusterIP、NodePort、LoadBalance,因为它们都有ClusterIP)都会存在一条或多条(每个端口映射对应一条规则)指向KUBE-SVC-xxx链的规则。而每个KUBE-SVC-xxx链的规则,依据副本数量的不同,会存在一个或多个指向KUBE-SEP-xxx链的规则(通过随机变量实现负载均衡)
KUBE-NODEPORTS :NodePort类型的service会存在一条或多条(每个端口映射对应一条规则)指向KUBE-SVC-xxx链的规则。而每个KUBE-SVC-xxx链的规则,依据副本数量的不同,会存在一个或多个指向KUBE-SEP-xxx链的规则(通过随机变量实现负载均衡)
KUBE-MARK-MASQ :用于给流量打上标签,配合KUBE-POSTROUTING链一起作用
KUBE-POSTROUTING :一般用于SNAT配置。对于通过ClusterIP访问某个服务的流量而言(NodePort同理,不再赘述),存在如下几种情况
sourceIp不属于podCidr,会设置SNAT,这样服务看到的流量来源就是cni0(这样做的目的是?)sourceIp属于podCidr,但是与ClusterIP背后的pod的IP不同,不设置SNATsourceIp属于podCidr,且与ClusterIP背后的pod的IP不同(自己访问自己),会设置SNAT,这样服务看到的流量来源就是cni0(这样做的目的是?)即便不做SNAT,也是没有问题的,只不过服务看到的流量来源没有被隐藏(通过iptables -t nat -I KUBE-POSTROUTING -j RETURN可以禁用后续的规则)
deployment(hello-world-deployment.yml)
1
2
3
4
5
6
7
8
9
10
11
12
13
14
15
16
17
18
19
20
21
22
23
apiVersion: apps/v1 kind: Deployment metadata: name: hello-world-deployment labels: mylabel: label_hello_world_deployment spec: replicas: 1 selector: matchLabels: mylabel: label_hello_world template: metadata: labels: mylabel: label_hello_world spec: containers: - name: hello-world image: registry.cn-hangzhou.aliyuncs.com/liuyehcf_default/liuye_repo:v1 imagePullPolicy: IfNotPresent command: ["java" , "-jar" , "lib/spring-boot-1.0-SNAPSHOT.jar" ] ports: - containerPort: 8080
service(hello-world-service.yml)
1
2
3
4
5
6
7
8
9
10
11
12
13
apiVersion: v1 kind: Service metadata: name: hello-world-service spec: ports: - protocol: TCP port: 4000 targetPort: 8080 nodePort: 30001 selector: mylabel: label_hello_world type: NodePort
创建deployment以及service
1
2
3
4
5
6
7
8
9
[root@k8s-master ~]$ kubectl apply -f hello-world-service.yml service/hello-world-service created [root@k8s-master ~]$ kubectl apply -f hello-world-deployment.yml deployment.apps/hello-world-deployment created
查找一下该pod部署在哪个node上
1
2
3
4
5
[root@k8s-master ~]$ kubectl get pods -o wide NAME READY STATUS RESTARTS AGE IP NODE NOMINATED NODE READINESS GATES hello-world-deployment-cbdf4db7b-j6fpq 1/1 Running 0 56s 10.244.1.5 k8s-n-1 <none> <none>
发现,应用部署在k8s-n-1上,查看k8s-n-1节点上的iptables规则,用30001作为条件过滤
1
2
3
4
5
[root@k8s-n-1 ~]$ iptables-save | grep '30001' -A KUBE-NODEPORTS -p tcp -m comment --comment "default/hello-world-service:" -m tcp --dport 30001 -j KUBE-MARK-MASQ -A KUBE-NODEPORTS -p tcp -m comment --comment "default/hello-world-service:" -m tcp --dport 30001 -j KUBE-SVC-5MRENC7Q6ZQR6GKR
我们找到了名为KUBE-NODEPORTS的Chain的两条规则,继续用KUBE-NODEPORTS寻找上游Chain
1
2
3
4
5
6
7
[root@k8s-n-1 ~]$ iptables-save | grep 'KUBE-NODEPORTS' :KUBE-NODEPORTS - [0:0] -A KUBE-NODEPORTS -p tcp -m comment --comment "default/hello-world-service:" -m tcp --dport 30001 -j KUBE-MARK-MASQ -A KUBE-NODEPORTS -p tcp -m comment --comment "default/hello-world-service:" -m tcp --dport 30001 -j KUBE-SVC-5MRENC7Q6ZQR6GKR -A KUBE-SERVICES -m comment --comment "kubernetes service nodeports; NOTE: this must be the last rule in this chain" -m addrtype --dst-type LOCAL -j KUBE-NODEPORTS
我们找到了名为KUBE-SERVICES的Chain的一条规则,继续用KUBE-SERVICES寻找上游Chain
1
2
3
4
5
6
7
8
9
10
11
12
13
14
15
16
17
18
19
20
21
[root@k8s-n-1 ~]$ iptables-save | grep 'KUBE-SERVICES' :KUBE-SERVICES - [0:0] -A INPUT -m conntrack --ctstate NEW -m comment --comment "kubernetes service portals" -j KUBE-SERVICES -A FORWARD -m conntrack --ctstate NEW -m comment --comment "kubernetes service portals" -j KUBE-SERVICES -A OUTPUT -m conntrack --ctstate NEW -m comment --comment "kubernetes service portals" -j KUBE-SERVICES :KUBE-SERVICES - [0:0] -A PREROUTING -m comment --comment "kubernetes service portals" -j KUBE-SERVICES -A OUTPUT -m comment --comment "kubernetes service portals" -j KUBE-SERVICES -A KUBE-SERVICES ! -s 10.244.0.0/16 -d 10.96.103.220/32 -p tcp -m comment --comment "default/hello-world-service: cluster IP" -m tcp --dport 4000 -j KUBE-MARK-MASQ -A KUBE-SERVICES -d 10.96.103.220/32 -p tcp -m comment --comment "default/hello-world-service: cluster IP" -m tcp --dport 4000 -j KUBE-SVC-5MRENC7Q6ZQR6GKR -A KUBE-SERVICES ! -s 10.244.0.0/16 -d 10.96.0.1/32 -p tcp -m comment --comment "default/kubernetes:https cluster IP" -m tcp --dport 443 -j KUBE-MARK-MASQ -A KUBE-SERVICES -d 10.96.0.1/32 -p tcp -m comment --comment "default/kubernetes:https cluster IP" -m tcp --dport 443 -j KUBE-SVC-NPX46M4PTMTKRN6Y -A KUBE-SERVICES ! -s 10.244.0.0/16 -d 10.96.0.10/32 -p udp -m comment --comment "kube-system/kube-dns:dns cluster IP" -m udp --dport 53 -j KUBE-MARK-MASQ -A KUBE-SERVICES -d 10.96.0.10/32 -p udp -m comment --comment "kube-system/kube-dns:dns cluster IP" -m udp --dport 53 -j KUBE-SVC-TCOU7JCQXEZGVUNU -A KUBE-SERVICES ! -s 10.244.0.0/16 -d 10.96.0.10/32 -p tcp -m comment --comment "kube-system/kube-dns:dns-tcp cluster IP" -m tcp --dport 53 -j KUBE-MARK-MASQ -A KUBE-SERVICES -d 10.96.0.10/32 -p tcp -m comment --comment "kube-system/kube-dns:dns-tcp cluster IP" -m tcp --dport 53 -j KUBE-SVC-ERIFXISQEP7F7OF4 -A KUBE-SERVICES ! -s 10.244.0.0/16 -d 10.96.0.10/32 -p tcp -m comment --comment "kube-system/kube-dns:metrics cluster IP" -m tcp --dport 9153 -j KUBE-MARK-MASQ -A KUBE-SERVICES -d 10.96.0.10/32 -p tcp -m comment --comment "kube-system/kube-dns:metrics cluster IP" -m tcp --dport 9153 -j KUBE-SVC-JD5MR3NA4I4DYORP -A KUBE-SERVICES -m comment --comment "kubernetes service nodeports; NOTE: this must be the last rule in this chain" -m addrtype --dst-type LOCAL -j KUBE-NODEPORTS
我们发现,PREROUTING、INPUT、FORWARD、OUTPUT为KUBE-SERVICES的上游Chain
接着我们回到Chain KUBE-NODEPORTS的规则,继续往下游分析,查看Chain KUBE-SVC-5MRENC7Q6ZQR6GKR
1
2
3
4
5
6
7
[root@k8s-n-1 ~]$ iptables-save | grep 'KUBE-SVC-5MRENC7Q6ZQR6GKR' :KUBE-SVC-5MRENC7Q6ZQR6GKR - [0:0] -A KUBE-NODEPORTS -p tcp -m comment --comment "default/hello-world-service:" -m tcp --dport 30001 -j KUBE-SVC-5MRENC7Q6ZQR6GKR -A KUBE-SERVICES -d 10.96.103.220/32 -p tcp -m comment --comment "default/hello-world-service: cluster IP" -m tcp --dport 4000 -j KUBE-SVC-5MRENC7Q6ZQR6GKR -A KUBE-SVC-5MRENC7Q6ZQR6GKR -j KUBE-SEP-2KIVNDBOTOCNVG2U
找到了一条规则,该规则指向了另一个Chain KUBE-SEP-2KIVNDBOTOCNVG2U,继续往下查看
1
2
3
4
5
6
7
[root@k8s-n-1 ~]$ iptables-save | grep 'KUBE-SEP-2KIVNDBOTOCNVG2U' :KUBE-SEP-2KIVNDBOTOCNVG2U - [0:0] -A KUBE-SEP-2KIVNDBOTOCNVG2U -s 10.244.1.5/32 -j KUBE-MARK-MASQ -A KUBE-SEP-2KIVNDBOTOCNVG2U -p tcp -m tcp -j DNAT --to-destination 10.244.1.5:8080 -A KUBE-SVC-5MRENC7Q6ZQR6GKR -j KUBE-SEP-2KIVNDBOTOCNVG2U
找到了一条DNAT规则,该规则将数据包的目的ip以及端口改写为10.244.1.5以及8080,然后继续查找路由表
1
2
3
4
[root@k8s-n-1 ~]$ ip r | grep '10.244.1.0/24' 10.244.1.0/24 dev cni0 proto kernel scope link src 10.244.1.1
我们发现,路由表指向的是cni0,每个pod都对应了一个veth pair,一端连接在网桥上,另一端在容器的网络命名空间中,我们可以通过brctl来查看网桥cni0的相关信息
1
2
3
4
5
6
7
8
9
10
11
12
13
[root@k8s-n-1 ~]$ brctl show cni0 bridge name bridge id STP enabled interfaces cni0 8000.2a11eb4c8527 no veth8469bbce [root@k8s-n-1 ~]$ brctl showmacs cni0 port no mac addr is local ? ageing timer 2 a6:92:e2:fd:6c:9c yes 0.00 2 a6:92:e2:fd:6c:9c yes 0.00 2 ca:97:47:ed:dd :01 no 3.75
可以看到,目前网桥cni0上只有一张网卡,该网卡类型是veth,veth是一对网卡,其中一张网卡在默认的网络命名空间中,另外一张网卡在pod的网络命名空间中。brctl showmacs cni0输出的三条数据中,其port都是2,代表这些对应着同一个网卡,即veth网卡,is local字段为true表示位于默认网络命名空间中,is local字段为false表示位于另一个网络命名空间中,接下来找到该docker的命名空间,然后进入该命名空间查看一下网卡的mac地址是否为ca:97:47:ed:dd:01,同时看一下该网卡的ip是否为10.244.1.5
注意,brctl showmacs cni0的输出中,is local为false的这条数据,ageing timer不是0.00,大约在300s后,这条数据将会消失。可以通过重新访问该veth网卡来激活(ping一下对应的pod ip)
1 2 3 4 5 6 7 8 9 10 11 12 13 14 15 16 17 18 19 20 21 22 [root@k8s-n-1 ~]$ pid=$(docker inspect -f '{{.State.Pid}}' e464807dae4f) [root@k8s-n-1 ~]$ nsenter -t ${pid} -n ifconfig eth0: flags=4163<UP,BROADCAST,RUNNING,MULTICAST> mtu 1450 inet 10.244.1.5 netmask 255.255.255.0 broadcast 0.0.0.0 inet6 fe80::c897:47ff:feed:dd01 prefixlen 64 scopeid 0x20<link > ether ca:97:47:ed:dd :01 txqueuelen 0 (Ethernet) RX packets 64 bytes 6286 (6.1 KiB) RX errors 0 dropped 0 overruns 0 frame 0 TX packets 49 bytes 5643 (5.5 KiB) TX errors 0 dropped 0 overruns 0 carrier 0 collisions 0 lo: flags=73<UP,LOOPBACK,RUNNING> mtu 65536 inet 127.0.0.1 netmask 255.0.0.0 inet6 ::1 prefixlen 128 scopeid 0x10<host> loop txqueuelen 1000 (Local Loopback) RX packets 0 bytes 0 (0.0 B) RX errors 0 dropped 0 overruns 0 frame 0 TX packets 0 bytes 0 (0.0 B) TX errors 0 dropped 0 overruns 0 carrier 0 collisions 0
接着,我们看下在k8s-n-2节点上,路由规则是怎样的
1
2
3
4
[root@k8s-n-2 ~]$ ip r | grep '10.244.1.0/24' 10.244.1.0/24 via 10.244.1.0 dev flannel.1 onlink
可以看到,在k8s-n-1节点上,直接路由到了flannel.1这样网卡,然后通过flannel的网络(主机网络或覆盖网络)到达k8s-n-1上
iptables规则链
flowchart TD
    A["PREROUTING/INPUT/OUTPUT/FORWARD"]
    B["KUBE-SERVICES"]
    C1["KUBE-MARK-MASQ"]
    C2["KUBE-SVC-nginx"]
    C3["KUBE-MARK-MASQ"]
    C4["KUBE-SVC-tomcat"]
    C5["KUBE-NODEPORTS"]
    D1["KUBE-SEP-nginx"]
    E1["DNAT redirect to nginx pod's ip and port"]

    A --> B
    B --> |nginx, srcIp not in cidr| C1
    B --> |nginx, srcIp in cidr| C2
    B --> |tomcat, srcIp not in cidr| C3
    B --> |tomcat, srcIp in cidr| C4
    B --> |last rule in the chain 'KUBE-SERVICES'| C5
    C2 --> D1
    D1 --> E1
deployment(hello-world-deployment.yml)
1
2
3
4
5
6
7
8
9
10
11
12
13
14
15
16
17
18
19
20
21
22
23
apiVersion: apps/v1 kind: Deployment metadata: name: hello-world-deployment labels: mylabel: label_hello_world_deployment spec: replicas: 3 selector: matchLabels: mylabel: label_hello_world template: metadata: labels: mylabel: label_hello_world spec: containers: - name: hello-world image: registry.cn-hangzhou.aliyuncs.com/liuyehcf_default/liuye_repo:v1 imagePullPolicy: IfNotPresent command: ["java" , "-jar" , "lib/spring-boot-1.0-SNAPSHOT.jar" ] ports: - containerPort: 8080
service(hello-world-service.yml)
1
2
3
4
5
6
7
8
9
10
11
12
13
apiVersion: v1 kind: Service metadata: name: hello-world-service spec: ports: - protocol: TCP port: 4000 targetPort: 8080 nodePort: 30001 selector: mylabel: label_hello_world type: NodePort
创建deployment以及service
1
2
3
4
5
6
7
8
9
[root@k8s-master ~]$ kubectl apply -f hello-world-service.yml service/hello-world-service created [root@k8s-master ~]$ kubectl apply -f hello-world-deployment.yml deployment.apps/hello-world-deployment created
查看一下pod的部署情况
1
2
3
4
5
6
7
[root@k8s-master ~]$ kubectl get pods -o wide NAME READY STATUS RESTARTS AGE IP NODE NOMINATED NODE READINESS GATES hello-world-deployment-cbdf4db7b-5qflq 1/1 Running 0 5m 10.244.2.2 k8s-n-2 <none> <none> hello-world-deployment-cbdf4db7b-j6fpq 1/1 Running 1 5h35m 10.244.1.6 k8s-n-1 <none> <none> hello-world-deployment-cbdf4db7b-qc624 1/1 Running 0 5m 10.244.1.7 k8s-n-1 <none> <none>
我们以k8s-n-1为例,首先以NodePort为关键字进行搜索
1
2
3
4
5
[root@k8s-n-1 ~]$ iptables-save | grep 30001 -A KUBE-NODEPORTS -p tcp -m comment --comment "default/hello-world-service:" -m tcp --dport 30001 -j KUBE-MARK-MASQ -A KUBE-NODEPORTS -p tcp -m comment --comment "default/hello-world-service:" -m tcp --dport 30001 -j KUBE-SVC-5MRENC7Q6ZQR6GKR
上游Chain与单副本完全一致,不再赘述,继续沿着下游Chain进行分析,搜索KUBE-SVC-5MRENC7Q6ZQR6GKR关键词
1
2
3
4
5
6
7
8
9
[root@k8s-n-1 ~]$ iptables-save | grep KUBE-SVC-5MRENC7Q6ZQR6GKR :KUBE-SVC-5MRENC7Q6ZQR6GKR - [0:0] -A KUBE-NODEPORTS -p tcp -m comment --comment "default/hello-world-service:" -m tcp --dport 30001 -j KUBE-SVC-5MRENC7Q6ZQR6GKR -A KUBE-SERVICES -d 10.96.103.220/32 -p tcp -m comment --comment "default/hello-world-service: cluster IP" -m tcp --dport 4000 -j KUBE-SVC-5MRENC7Q6ZQR6GKR -A KUBE-SVC-5MRENC7Q6ZQR6GKR -m statistic --mode random --probability 0.33333333349 -j KUBE-SEP-NQUZNNDG4S4UQTZI -A KUBE-SVC-5MRENC7Q6ZQR6GKR -m statistic --mode random --probability 0.50000000000 -j KUBE-SEP-XYEBSHB6XMTA6LVQ -A KUBE-SVC-5MRENC7Q6ZQR6GKR -j KUBE-SEP-AFBU56PEPWZ4VPIJ
这里,我们就能发现单副本与多副本之间的差异了,在单副本的例子中,只有一条规则,而多副本的例子中,有多条规则(规则数量与副本数保持一致),并且使用了statistic模块,引入了随机因子,用于实现负载均衡的功能(iptables -m statistic -h查看该模块的参数),然后,分别查看三个下游Chain
1
2
3
4
5
6
7
8
9
10
11
12
13
14
15
16
17
18
19
20
21
22
23
[root@k8s-n-1 ~]$ iptables-save | grep KUBE-SEP-NQUZNNDG4S4UQTZI :KUBE-SEP-NQUZNNDG4S4UQTZI - [0:0] -A KUBE-SEP-NQUZNNDG4S4UQTZI -s 10.244.1.6/32 -j KUBE-MARK-MASQ -A KUBE-SEP-NQUZNNDG4S4UQTZI -p tcp -m tcp -j DNAT --to-destination 10.244.1.6:8080 -A KUBE-SVC-5MRENC7Q6ZQR6GKR -m statistic --mode random --probability 0.33333333349 -j KUBE-SEP-NQUZNNDG4S4UQTZI [root@k8s-n-1 ~]$ iptables-save | grep KUBE-SEP-XYEBSHB6XMTA6LVQ :KUBE-SEP-XYEBSHB6XMTA6LVQ - [0:0] -A KUBE-SEP-XYEBSHB6XMTA6LVQ -s 10.244.1.7/32 -j KUBE-MARK-MASQ -A KUBE-SEP-XYEBSHB6XMTA6LVQ -p tcp -m tcp -j DNAT --to-destination 10.244.1.7:8080 -A KUBE-SVC-5MRENC7Q6ZQR6GKR -m statistic --mode random --probability 0.50000000000 -j KUBE-SEP-XYEBSHB6XMTA6LVQ [root@k8s-n-1 ~]$ iptables-save | grep KUBE-SEP-AFBU56PEPWZ4VPIJ :KUBE-SEP-AFBU56PEPWZ4VPIJ - [0:0] -A KUBE-SEP-AFBU56PEPWZ4VPIJ -s 10.244.2.2/32 -j KUBE-MARK-MASQ -A KUBE-SEP-AFBU56PEPWZ4VPIJ -p tcp -m tcp -j DNAT --to-destination 10.244.2.2:8080 -A KUBE-SVC-5MRENC7Q6ZQR6GKR -j KUBE-SEP-AFBU56PEPWZ4VPIJ
这里,可以看到,三个Chain,每个Chain分别配置了一个DNAT,指向某一个pod。后续的链路,如果在pod在本机,则走cni0网桥,否则就走flannel
iptables规则链
flowchart TD
    A["PREROUTING/INPUT/OUTPUT/FORWARD"]
    B["KUBE-SERVICES"]
    C1["KUBE-MARK-MASQ"]
    C2["KUBE-SVC-NGINX"]
    C3["KUBE-MARK-MASQ"]
    C4["KUBE-SVC-TOMCAT"]
    C5["KUBE-NODEPORTS"]
    D1["KUBE-SEP-nginx1"]
    D2["KUBE-SEP-nginx2"]
    D3["KUBE-SEP-nginx3"]
    E1["DNAT redirect to nginx pod1's ip and port"]
    E2["DNAT redirect to nginx pod2's ip and port"]
    E3["DNAT redirect to nginx pod3's ip and port"]

    A --> B
    B --> |nginx, srcIp not in cidr| C1
    B --> |nginx, srcIp in cidr| C2
    B --> |tomcat, srcIp not in cidr| C3
    B --> |tomcat, srcIp in cidr| C4
    B --> |last rule in the chain 'KUBE-SERVICES'| C5
    C2 --> |random| D1
    C2 --> |random| D2
    C2 --> |random| D3
    D1 --> E1
    D2 --> E2
    D3 --> E3
每个node上的pod,其子网都相同
同个node之间pod相互访问,最终会走到cni网桥,该网桥等价于一个二层交换机,接着一对veth网卡,其中一段在默认的网络命名空间,另一端在pod的网络命名空间
不同node之间的pod相互访问,最终会走到flannel
coreDNS是每个Kubernetes集群都会安装的系统组件,用于Service的解析,将服务名称解析成ClusterIP
一般来说,coredns以deployment运行在集群中(也可能是daemonset)
1
2
3
4
5
[root@k8s-master ~]$ kubectl get deployment -n kube-system NAME READY UP-TO-DATE AVAILABLE AGE coredns 2/2 2 2 149d
下面,我们用一个pod来验证一下dnsutils.yaml,yaml文件内容如下,dnsutils这个镜像中包含了dig、nslookup等命令,换成其他任何包含这个两个命令的镜像都行
1
2
3
4
5
6
7
8
9
10
11
12
13
apiVersion: v1 kind: Pod metadata: name: dnsutils namespace: default spec: containers: - name: dnsutils image: gcr.io/kubernetes-e2e-test-images/dnsutils:1.3 command: - sleep - "3600" imagePullPolicy: IfNotPresent
1 2 3 4 5 6 7 8 9 10 11 12 13 14 15 16 17 18 19 20 21 22 23 24 25 26 27 28 29 30 31 32 33 34 35 36 37 38 39 40 41 42 43 44 45 46 47 48 49 50 51 52 53 54 55 56 57 58 59 60 [root@k8s-master ~]$ kubectl apply -f dnsutils.yaml pod/dnsutils created [root@k8s-master ~]$ kubectl get pods NAME READY STATUS RESTARTS AGE dnsutils 1/1 Running 0 33s [root@k8s-master ~]$ kubectl get svc NAME TYPE CLUSTER-IP EXTERNAL-IP PORT(S) AGE kubernetes ClusterIP 10.96.0.1 <none> 443/TCP 28d [root@k8s-master ~]$ kubectl get svc -n kube-system NAME TYPE CLUSTER-IP EXTERNAL-IP PORT(S) AGE kube-dns ClusterIP 10.96.0.10 <none> 53/UDP,53/TCP,9153/TCP 149d tiller-deploy ClusterIP 10.108.160.127 <none> 44134/TCP 118d [root@k8s-master ~]$ kubectl exec -it dnsutils -- cat /etc/resolv.conf nameserver 10.96.0.10 search default.svc.cluster.local svc.cluster.local cluster.local hz.ali.com options ndots:5 [root@k8s-master ~]$ kubectl exec -it dnsutils -- nslookup kubernetes Server: 10.96.0.10 Address: 10.96.0.10 Name: kubernetes.default.svc.cluster.local Address: 10.96.0.1 [root@k8s-master ~]$ kubectl exec -it dnsutils -- nslookup tiller-deploy.kube-system Server: 10.96.0.10 Address: 10.96.0.10 Non-authoritative answer: Name: tiller-deploy.kube-system.svc.cluster.local Address: 10.108.160.127 [root@k8s-master ~]$ kubectl delete -f dnsutils.yaml pod "dnsutils" deleted
接下来,将修改dnsutils.yaml,设置成hostnetwork,同时不指定dnsPolicy
1
2
3
4
5
6
7
8
9
10
11
12
13
14
apiVersion: v1 kind: Pod metadata: name: dnsutils namespace: default spec: hostNetwork: true containers: - name: dnsutils image: gcr.io/kubernetes-e2e-test-images/dnsutils:1.3 command: - sleep - "3600" imagePullPolicy: IfNotPresent
1 2 3 4 5 6 7 8 9 10 11 12 13 14 15 16 17 18 19 20 21 22 23 24 25 26 27 28 29 30 31 32 33 34 35 36 37 38 39 40 41 42 43 44 45 46 47 48 49 50 51 52 53 [root@k8s-master ~]$ kubectl apply -f dnsutils.yaml pod/dnsutils created [root@k8s-master ~]$ kubectl get pods NAME READY STATUS RESTARTS AGE dnsutils 1/1 Running 0 29s [root@k8s-master ~]$ kubectl get svc NAME TYPE CLUSTER-IP EXTERNAL-IP PORT(S) AGE kubernetes ClusterIP 10.96.0.1 <none> 443/TCP 28d [root@k8s-master ~]$ kubectl get svc -n kube-system NAME TYPE CLUSTER-IP EXTERNAL-IP PORT(S) AGE kube-dns ClusterIP 10.96.0.10 <none> 53/UDP,53/TCP,9153/TCP 149d tiller-deploy ClusterIP 10.108.160.127 <none> 44134/TCP 118d [root@k8s-master ~]$ kubectl exec -it dnsutils -- cat /etc/resolv.conf nameserver 30.14.129.245 nameserver 30.14.128.82 nameserver 10.65.0.201 search hz.ali.com [root@k8s-master ~]$ kubectl exec -it dnsutils -- nslookup kubernetes ;; Got SERVFAIL reply from 30.14.129.245, trying next server ;; Got SERVFAIL reply from 30.14.128.82, trying next server Server: 10.65.0.201 Address: 10.65.0.201 server cant find kubernetes: SERVFAIL command terminated with exit code 1[root@k8s-master ~]$ kubectl delete -f dnsutils.yaml pod "dnsutils" deleted
我们继续修改dnsutils.yaml,设置成hostnetwork,同时将dnsPolicy设置为ClusterFirstWithHostNet
1
2
3
4
5
6
7
8
9
10
11
12
13
14
15
apiVersion: v1 kind: Pod metadata: name: dnsutils namespace: default spec: hostNetwork: true dnsPolicy: ClusterFirstWithHostNet containers: - name: dnsutils image: gcr.io/kubernetes-e2e-test-images/dnsutils:1.3 command: - sleep - "3600" imagePullPolicy: IfNotPresent
1 2 3 4 5 6 7 8 9 10 11 12 13 14 15 16 17 18 19 20 21 22 23 24 25 26 27 28 29 30 31 32 33 34 35 36 37 38 39 40 41 42 43 44 45 46 47 48 49 50 51 52 53 54 55 56 57 58 59 60 [root@k8s-master ~]$ kubectl apply -f dnsutils.yaml pod/dnsutils created [root@k8s-master ~]$ kubectl get pods NAME READY STATUS RESTARTS AGE dnsutils 1/1 Running 0 42 [root@k8s-master ~]$ kubectl get svc NAME TYPE CLUSTER-IP EXTERNAL-IP PORT(S) AGE kubernetes ClusterIP 10.96.0.1 <none> 443/TCP 28d [root@k8s-master ~]$ kubectl get svc -n kube-system NAME TYPE CLUSTER-IP EXTERNAL-IP PORT(S) AGE kube-dns ClusterIP 10.96.0.10 <none> 53/UDP,53/TCP,9153/TCP 149d tiller-deploy ClusterIP 10.108.160.127 <none> 44134/TCP 118d [root@k8s-master ~]$ kubectl exec -it dnsutils -- cat /etc/resolv.conf nameserver 10.96.0.10 search default.svc.cluster.local svc.cluster.local cluster.local hz.ali.com options ndots:5 [root@k8s-master ~]$ kubectl exec -it dnsutils -- nslookup kubernetes Server: 10.96.0.10 Address: 10.96.0.10 Name: kubernetes.default.svc.cluster.local Address: 10.96.0.1 [root@k8s-master ~]$ kubectl exec -it dnsutils -- nslookup tiller-deploy.kube-system Server: 10.96.0.10 Address: 10.96.0.10 Non-authoritative answer: Name: tiller-deploy.kube-system.svc.cluster.local Address: 10.108.160.127 [root@k8s-master ~]$ kubectl delete -f dnsutils.yaml pod "dnsutils" deleted
使用主机网络后,PodIP就是主机IP,ContainerPort就是主机Port
如果一个设置了主机网络的Pod,想要通过serviceName:servicePort来访问其他服务的时候,需要将dnsPolicy配置成ClusterFirstWithHostNet
此外,如果配置了一个Service,以NodePort方式将设置了主机网络的Pod对外露出,可能会导致这样的问题:假设主机A上部署了一个主机网络的Pod,并且以NodePort对外露出,NodePort=30001,此时访问主机B的30001端口,请求有可能无法触达A,原因如下:
kube-proxy设置的iptables规则可能会与用户设置的iptables规则冲突,因此k8s事先约定了一个NodePort范围,30000-32767,且在初始化集群时,需要指定一个网段用于分配PodIP,在这样的限制条件下,kube-proxy设置的iptables规则才能与用户原有的iptables规则互不影响当服务以NodePort形式露出时,且Pod为容器网络时,kube-proxy会配置如下两条规则
一条DNAT规则,改写目的端口为NodePort的IP数据包头,将其改为PodIP
一条FORWARD规则,对应的网段就是PodIP的网段
当服务以NodePort形式露出,且Pod为主机网络时,只设置了一条DNAT规则,而一般来说,FORWARD的默认策略是DROP。因此
当Pod的IP就是当前主机的IP时,直接走INPUT,进入本地网络协议栈,可以正常访问服务
当Pod的IP是其他主机的IP时,经过FORWARD,由于没有配置对应的规则,流量被直接DROP,无法正常访问服务
解决方式:iptables -P FORWARD ACCEPT,将默认的FORWARD策略改为ACCEPT
以下两个配置项,需要设置成1,否则iptables规则无法应用于二层转发(同主机的pod之间的网络通信走的是二层转发)
net.bridge.bridge-nf-call-ip6tables
net.bridge.bridge-nf-call-iptables
以下三个配置项,需要设置成1,否则流量从网卡cni0出来之后,无法forward到主机的外网网卡上,意味着,容器里面是无法访问公网的,具体表现就是在容器网络的容器中无法ping通外网ip
net.ipv4.ip_forward
net.ipv4.conf.all.forwarding
net.ipv6.conf.all.forwarding
如何修改配置
1 2 3 4 5 6 7 8 9 10 11 12 13 14 15 16 echo 1 > /proc/sys/net/bridge/bridge-nf-call-ip6tablesecho 1 > /proc/sys/net/bridge/bridge-nf-call-iptablesecho 1 > /proc/sys/net/ipv4/ip_forwardecho 1 > /proc/sys/net/ipv4/conf/all/forwardingecho 1 > /proc/sys/net/ipv6/conf/all/forwardingcat >> /etc/sysctl.conf << 'EOF' net.bridge.bridge-nf-call-ip6tables=1 net.bridge.bridge-nf-call-iptables=1 net.ipv4.ip_forward=1 net.ipv4.conf.all.forwarding=1 net.ipv6.conf.all.forwarding=1 EOF sysctl -p /etc/sysctl.conf
systemctl status firewalld
一般来说,DNAT的目的ip的流转方式有3类
如果目的ip是当前主机的某个podIp,那么流量会转发到cni0,一般来说,这种情况都是没啥问题的
如果目的ip是另一台主机的某个podIp,那么流量会转发到flannel.1,然后通过overlay转发到podIp所在的主机上
可能的网络限制:由于overlay是通过udp转发的,需要检查下主机是否有针对udp的过滤配置
如果目的ip是某个机器的ip,那么直接走外网网卡或者lo
机器的ip如果变化了,那么iptables中记录的DNAT目的ip可能还是一个旧的主机ip,因此这个时候需要重启下pod,更新下iptables规则
对于coredns来说,容器内的/etc/resolv.conf文件是在容器创建的时候,从宿主机上拷贝的。如果主机恰好用的dhcp的方式获取ip,那么获取的dns地址很有可能是dhcp的地址,这个地址是可能会失效的
对于普通的容器网络的容器来说,容器内的/etc/resolv.conf配置的是coredns的clusterIp,因此不需要改动
对于主机网络,且dnsPolicy为ClusterFirst的容器来说,容器内的/etc/resolv.conf文件是在容器创建的时候,从宿主机上拷贝的。如果主机恰好用的dhcp的方式获取ip,那么获取的dns地址很有可能是dhcp的地址,这个地址是可能会失效的
tcpdump抓包
iptables配置一些打印日志的规则
1
2
3
4
5
iptables -I INPUT -p icmp -j LOG --log-prefix "liuye-input: " iptables -I FORWARD -p icmp -j LOG --log-prefix "liuye-forward: " iptables -I OUTPUT -p icmp -j LOG --log-prefix "liuye-output: " iptables -t nat -I PREROUTING -p icmp -j LOG --log-prefix "liuye-prerouting: " iptables -t nat -I POSTROUTING -p icmp -j LOG --log-prefix "liuye-postrouting: "
现象:在容器中,pingk8s域名失败,ping外网域名失败
kube-proxy包含如下日志:
1 W1009 12:41:47.192659 6 proxier.go:320] missing br-netfilter module or unset sysctl br-nf-call-iptables; proxy may not work as intended
原因就是没有开启bridge-nf-call-iptables,当bridge-nf-call-iptables开启时,在二层网桥转发的数据也会被iptables链进制规则限制,而同主机的pod直接的数据转发是直接通过网桥进行转发的,而网桥在二层网络进行数据处理,所以bridge-nf-call-iptables没有开启时,pod无法通过clusterIP访问同主机的pod
如何开启
echo '1' > /proc/sys/net/bridge/bridge-nf-call-iptables:立即生效,重启后还原为默认配置echo 'net.bridge.bridge-nf-call-iptables=1' >> /etc/sysctl.conf && sysctl -p /etc/sysctl.conf:修改默认配置,重启后也能生效