阅读更多
1 快捷键
1.1 清屏
command + k
1.2 关闭显示器
⌃ + ⇧ + 电源键(貌似只能锁屏,并未关闭显示器)- 系统偏好设置->调度中心->触发角(亲测可用)
1.3 锁定屏幕
⌃ + ⌘ + Q
1.4 显示当前应用的多个窗口
^ + ↓
1.5 显示正在执行的任务
^ + ↑
1.6 启动台
F10
1.7 露出桌面
F11
1.8 显示隐藏文件夹
⌘ + ⇧ + .
也有如下非快捷键的方法
1 | //显示 |
1.9 微粒度音量调节
⌥ + ⇧ + 音量调节按键
1.10 应用图标抖动
在launchpad界面中,⌃ + ⌥ + ⌘ + B
1.11 emoji
⌃ + ⌘ + space
1.12 Page Up/Down
Home键:Fn+←
End键:Fn+→
Page UP:Fn+↑
Page DOWN:Fn+↓
向前Delete:Fn+delete
1.13 缩放窗口
窗口缩放功能的配置路径是:System Preferences->Dock->Double-click a window's title bar to zoom
默认情况下,该功能是没有对应的快捷键的,但是我们可以手动设置
System Preferences->Keyboard->Shortcuts->App Shortcuts- 新增快捷键
Application:所有类型Menu Title:ZoomKeyboard Shortcut:自定义,我设置的是⌃ + ⌘ + M
1.14 修改大小写切换方式
System Preferences->Keyboard->Text Input Edit->Press and hold to enable typing in all uppercase- 14.x 没有这个配置选项了
1.15 如何修改用户名
Change the name of your macOS user account and home folder
1.16 如何修改HostName/ComputerName
1 | scutil --get HostName |
1.17 禁用密码校验规则
1 | # back up all account policies |
2 Homebrew
2.1 常用操作
1 | brew install <software> |
2.2 国内安装Homebrew
常规安装脚本(推荐/完全体/几分钟安装完成):
1 | /bin/bash -c "$(curl -fsSL https://gitee.com/cunkai/HomebrewCN/raw/master/Homebrew.sh)" |
极速安装脚本(精简版/几秒钟安装完成):
1 | /bin/bash -c "$(curl -fsSL https://gitee.com/cunkai/HomebrewCN/raw/master/Homebrew.sh)" speed |
卸载脚本:
1 | /bin/bash -c "$(curl -fsSL https://gitee.com/cunkai/HomebrewCN/raw/master/HomebrewUninstall.sh)" |
2.3 更换Homebrew镜像源
1 | # step 1: 替换brew.git |
2.4 常用软件下载
1 | brew install openjdk@11 |
2.4.1 解压缩
1 | file xxx.zip |
3 常用功能
3.1 升级bash
1 | brew install bash |
注意,sudo mv /bin/bash /bin/bash.origin可能因为权限的问题,无法成功执行,这时,我们需要关闭Mac的SIP机制
3.2 开启关闭SIP
- 进入恢复模式:
- Intel:重启,然后按住
⌘ + R,直到看到logo后松开 - Arm:关机,按住开机键10s以上,直至进入恢复模式
- Intel:重启,然后按住
- 出现界面之后,上面菜单栏 -> 实用工具 -> 终端
- 在Terminal中输入
csrutil disable关闭SIP(csrutil enable打开SIP) - 重启
3.3 开启关闭任何来源
1 | # 开启 |
3.4 刻录iso文件
1 | # 先列出所有设备 |
3.5 打开/禁止产生.DS_Store文件
1 | # 禁止 |
3.6 开启HiDPI
3.7 清理磁盘
最近我的磁盘容量快被系统吃满了,排查了一下,发现这几个路径
/Library/Application Support/Library/Application Support/Symantec/AntiVirus:Symantec这个软件一直在做备份
/Library/Caches~/Library/Caches~/Library/Caches/IntelliJIdea2018.1:IntelliJIdea的一些缓存数据
3.8 卸载itunes
为什么要卸载,升级完mac之后,发现某些应用的f8快捷键失效了,一按f8就会自动打开itunes
我们是无法通过正常方式卸载itunes的,sudo rm -rf /System/Applications/Music.app会提示Operation not permitted,即便切到root账号也无法执行,这是因为mac对此类行为做了安全防护
我们可以通过csrutil disable解除这个限制。但是该命令需要到恢复模式才能用
如何进入恢复模式:重启电脑,按COMMAND+R组合键进入恢复模式
进入恢复模式后,在屏幕上方点击实用工具->终端,然后再执行csrutil disable即可
当关闭mac的System Integrity Protection功能之后,再次尝试删除itunues,发现还是删除不了,这次提示的是Read-only file system,无语
后来在Stop F8 key from launching iTunes?找到了解决方案
System Preferences->Keyboard->Keyboard- 取消
Use all F1,F2,etc. keys as standard function keys选项的勾选
3.9 Virtual Machine
3.10 Docker
3.10.1 failed to connect to /var/run/com.docker.vmnetd.sock
System Preferences->Privacy & Security->Full Disk Access-> Add Docker.
4 Iterm2
智能选中
- 双击选中
- 三击选中整行
- 四击智能选中
- 选中即复制
按住Command
- 拖拽选中字符串
- 点击url,访问网页
- 点击文件,用默认程序打开此文件
- 点击文件夹,在Finder中打开
- 同时按住option键,可以以矩形选中,类似于vim中的ctrl v操作
常用快捷键
- 切换窗口:
⌘+←、⌘+→、⌘+数字 - 新建窗口:
⌘+t - 垂直切分当前窗口:
⌘+d - 水平切分当前窗口:
⌘+⇧+d - 智能查找:
⌘+f - 历史记录窗口:
⌘+⇧+h - 全屏所有tab:
⌘+⌥+e - 锁定鼠标位置:
⌘+/
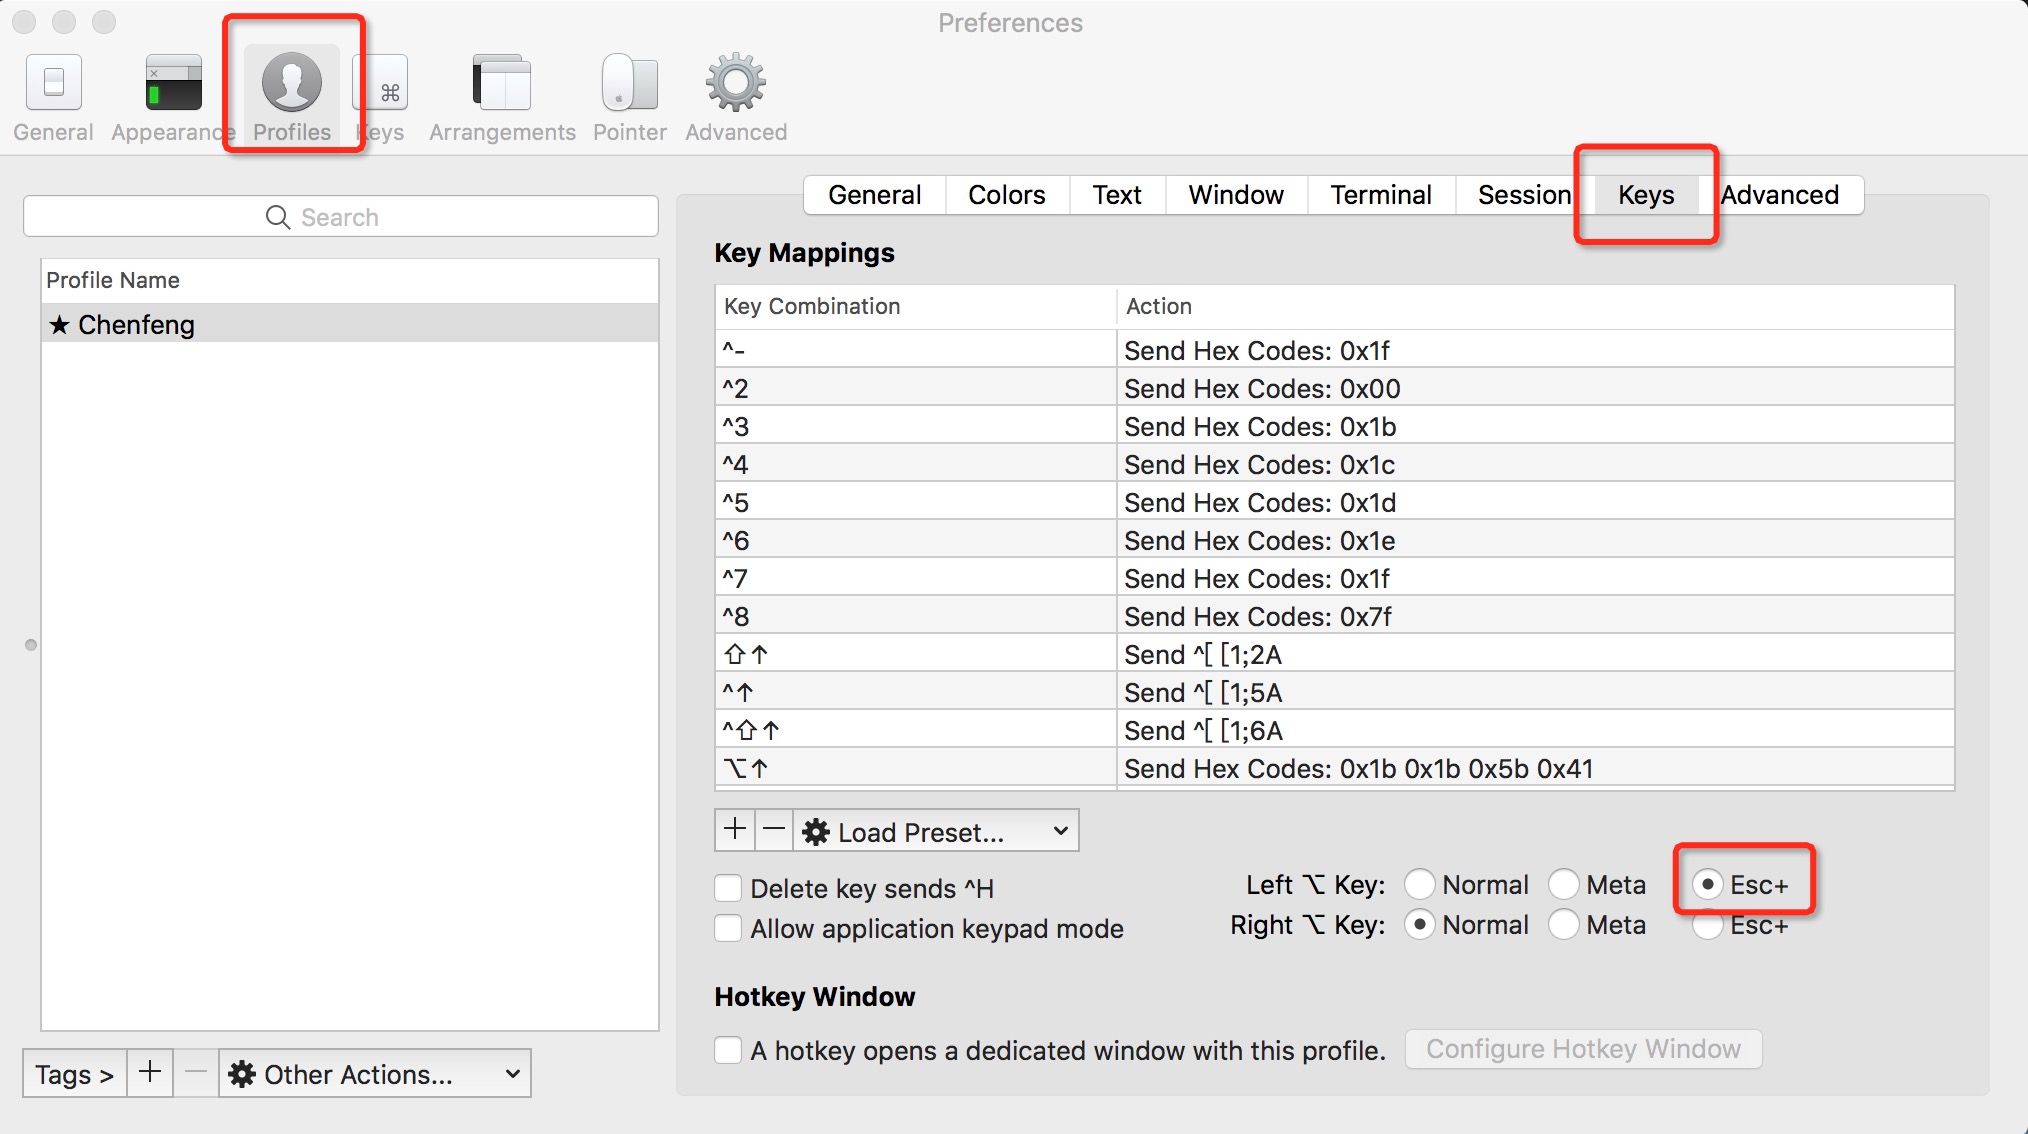
设置⌥+←、⌥+→以单词为单位移动光标
- 首先打开iTerm2的preferences–>profile–>Keys,将常用的左Alt键设置为换码符(escape character)。如下图所示
- 接下来在Key mappings中找到已经存在的
⌥←及⌥→,如果没有的话,就新建这两个快捷键 - 将
⌥←的设置修改为如下内容- Keyboard Shortcut:
⌥← - Action:
Send Escape Sequence - Esc+:
b
- Keyboard Shortcut:
- 将
⌥→的设置修改为如下内容- Keyboard Shortcut:
⌥→ - Action:
Send Escape Sequence - Esc+:
f
- Keyboard Shortcut:
设置滚动行数
Preferences->Profiles->Terminal
设置语言
export LANG=en_US.UTF-8export LANG=zh_CN.UTF-8
4.1 更换主题
本小节转载摘录自iTerm 2 && Oh My Zsh【DIY教程——亲身体验过程】
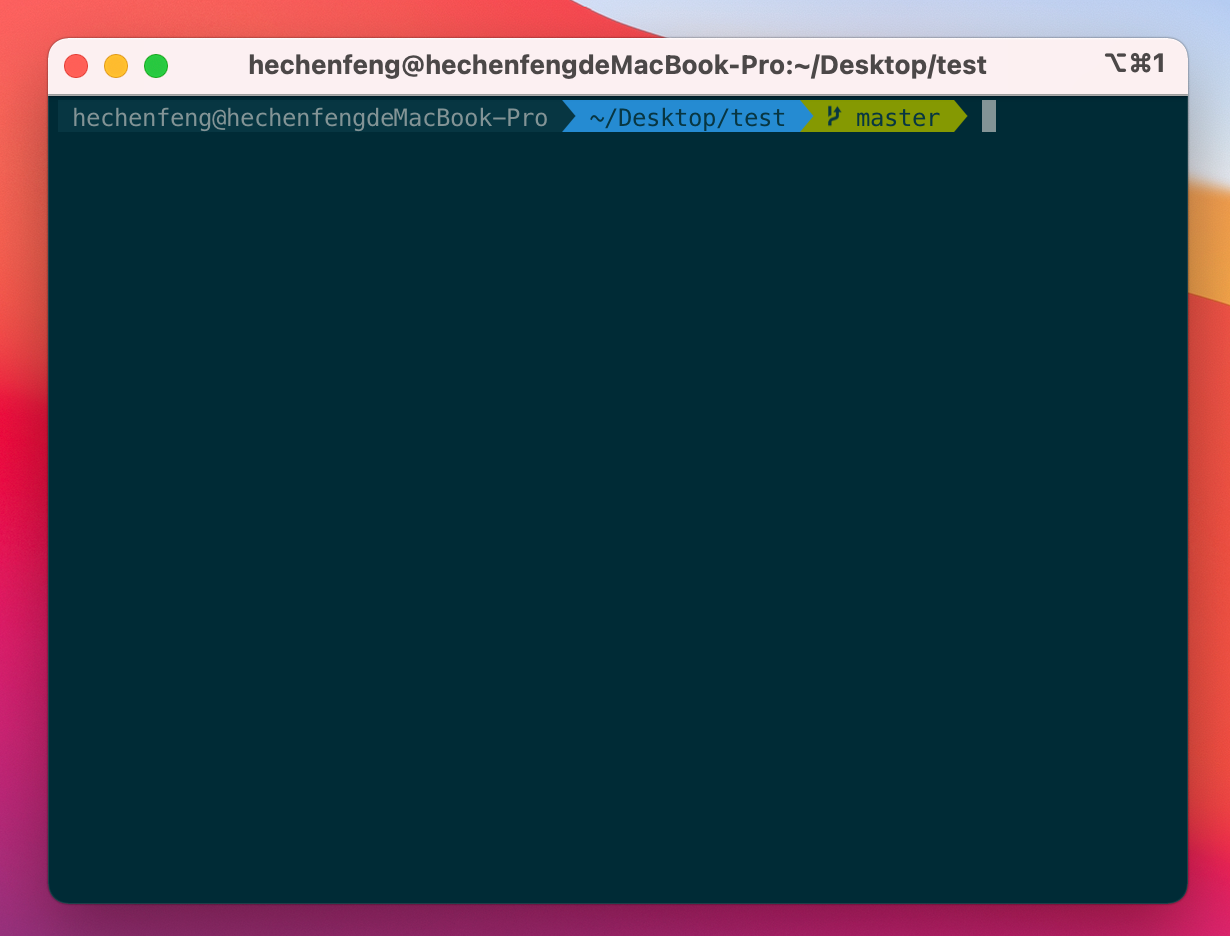
先上效果
步骤1:安装iterm2,不赘述
步骤2:安装ohmyzsh,不赘述。有时国内下载不下来,可以参考下面的步骤安装
1 | git clone https://github.com/ohmyzsh/ohmyzsh.git --depth 1 |
Tips:
- 修改
~/.zshrc,在source $ZSH/oh-my-zsh.sh上面增加export ZSH_COMPDUMP=$ZSH/cache/.zcompdump-$HOST,可以调整.zcompdump文件的生成路径 - 修改
~/.zshrc,在source $ZSH/oh-my-zsh.sh上面增加export DISABLE_AUTO_UPDATE=true,可以禁止自动更新检查 - 修改
~/.zshrc,在source $ZSH/oh-my-zsh.sh上面增加export DISABLE_MAGIC_FUNCTIONS=true,可以禁用魔术函数,粘贴长串命令更快
步骤3:安装Powerline
1 | sudo brew install pip |
步骤4:安装Powerline的字体库
1 | git clone https://github.com/powerline/fonts.git --depth 1 |
安装时,会提示所有字体均已下载到/Users/<user name>/Library/Fonts
步骤5:将iterm2的字体设置为Powerline的字体
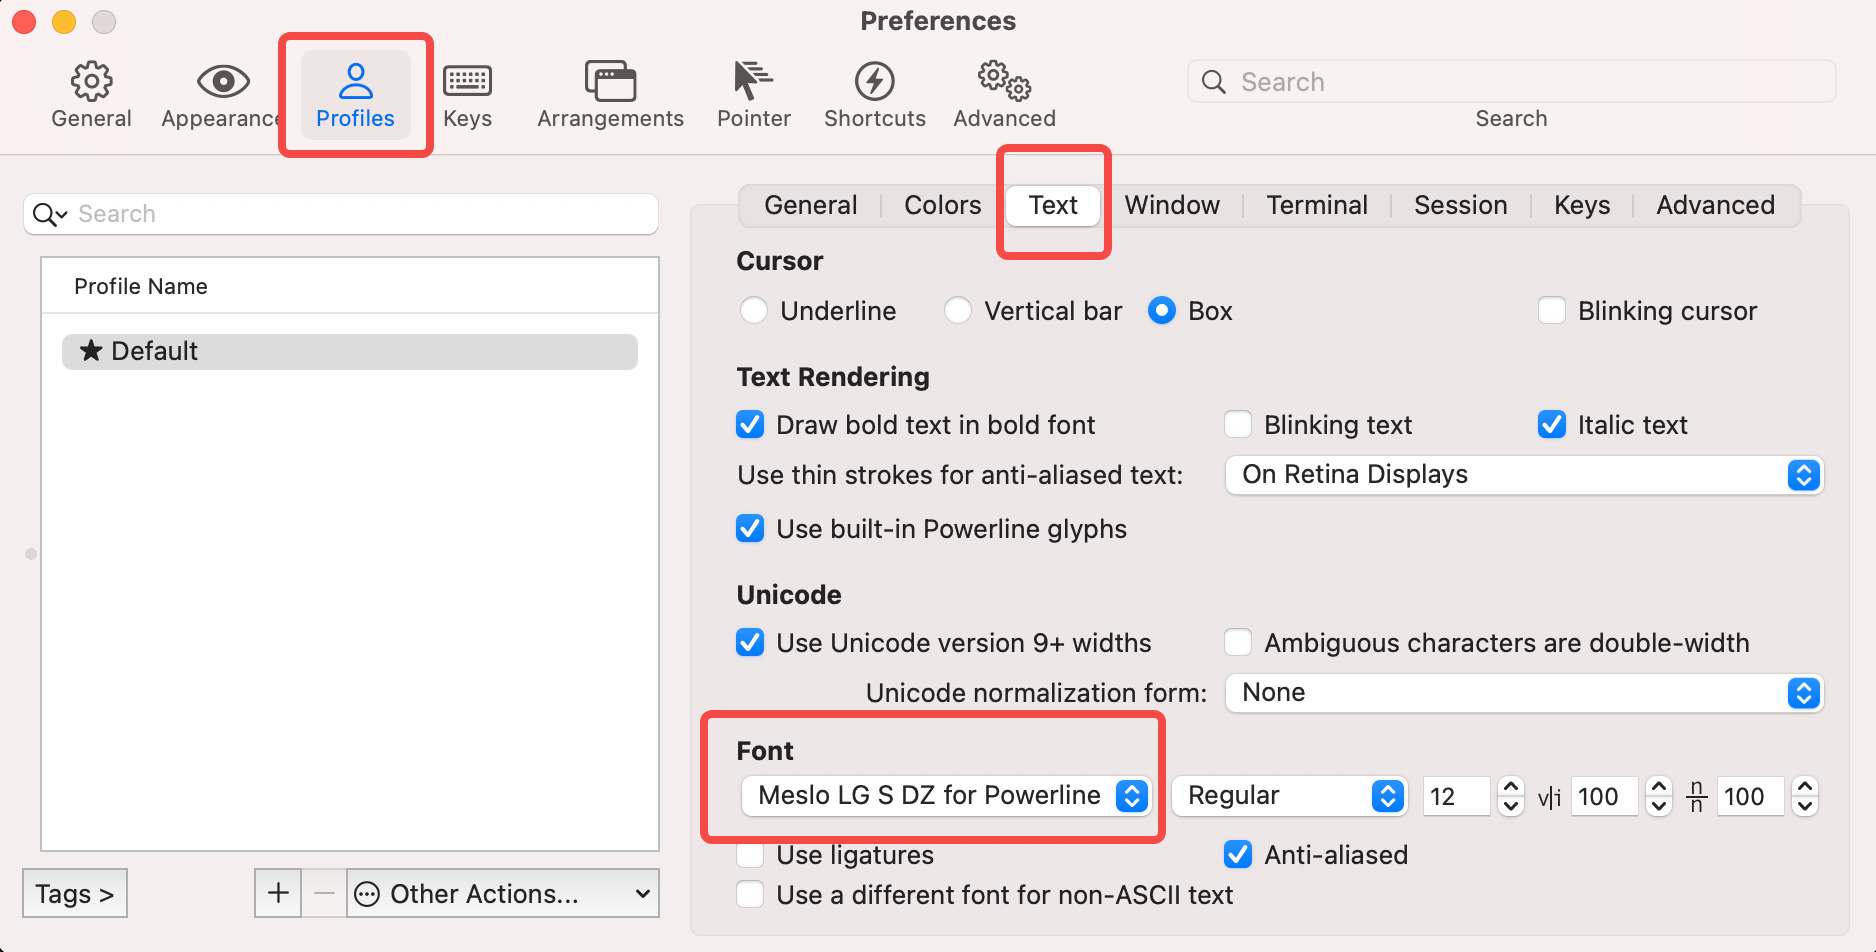
在iterm2中使用Powerline字体:Preferences -> Profiles -> Text
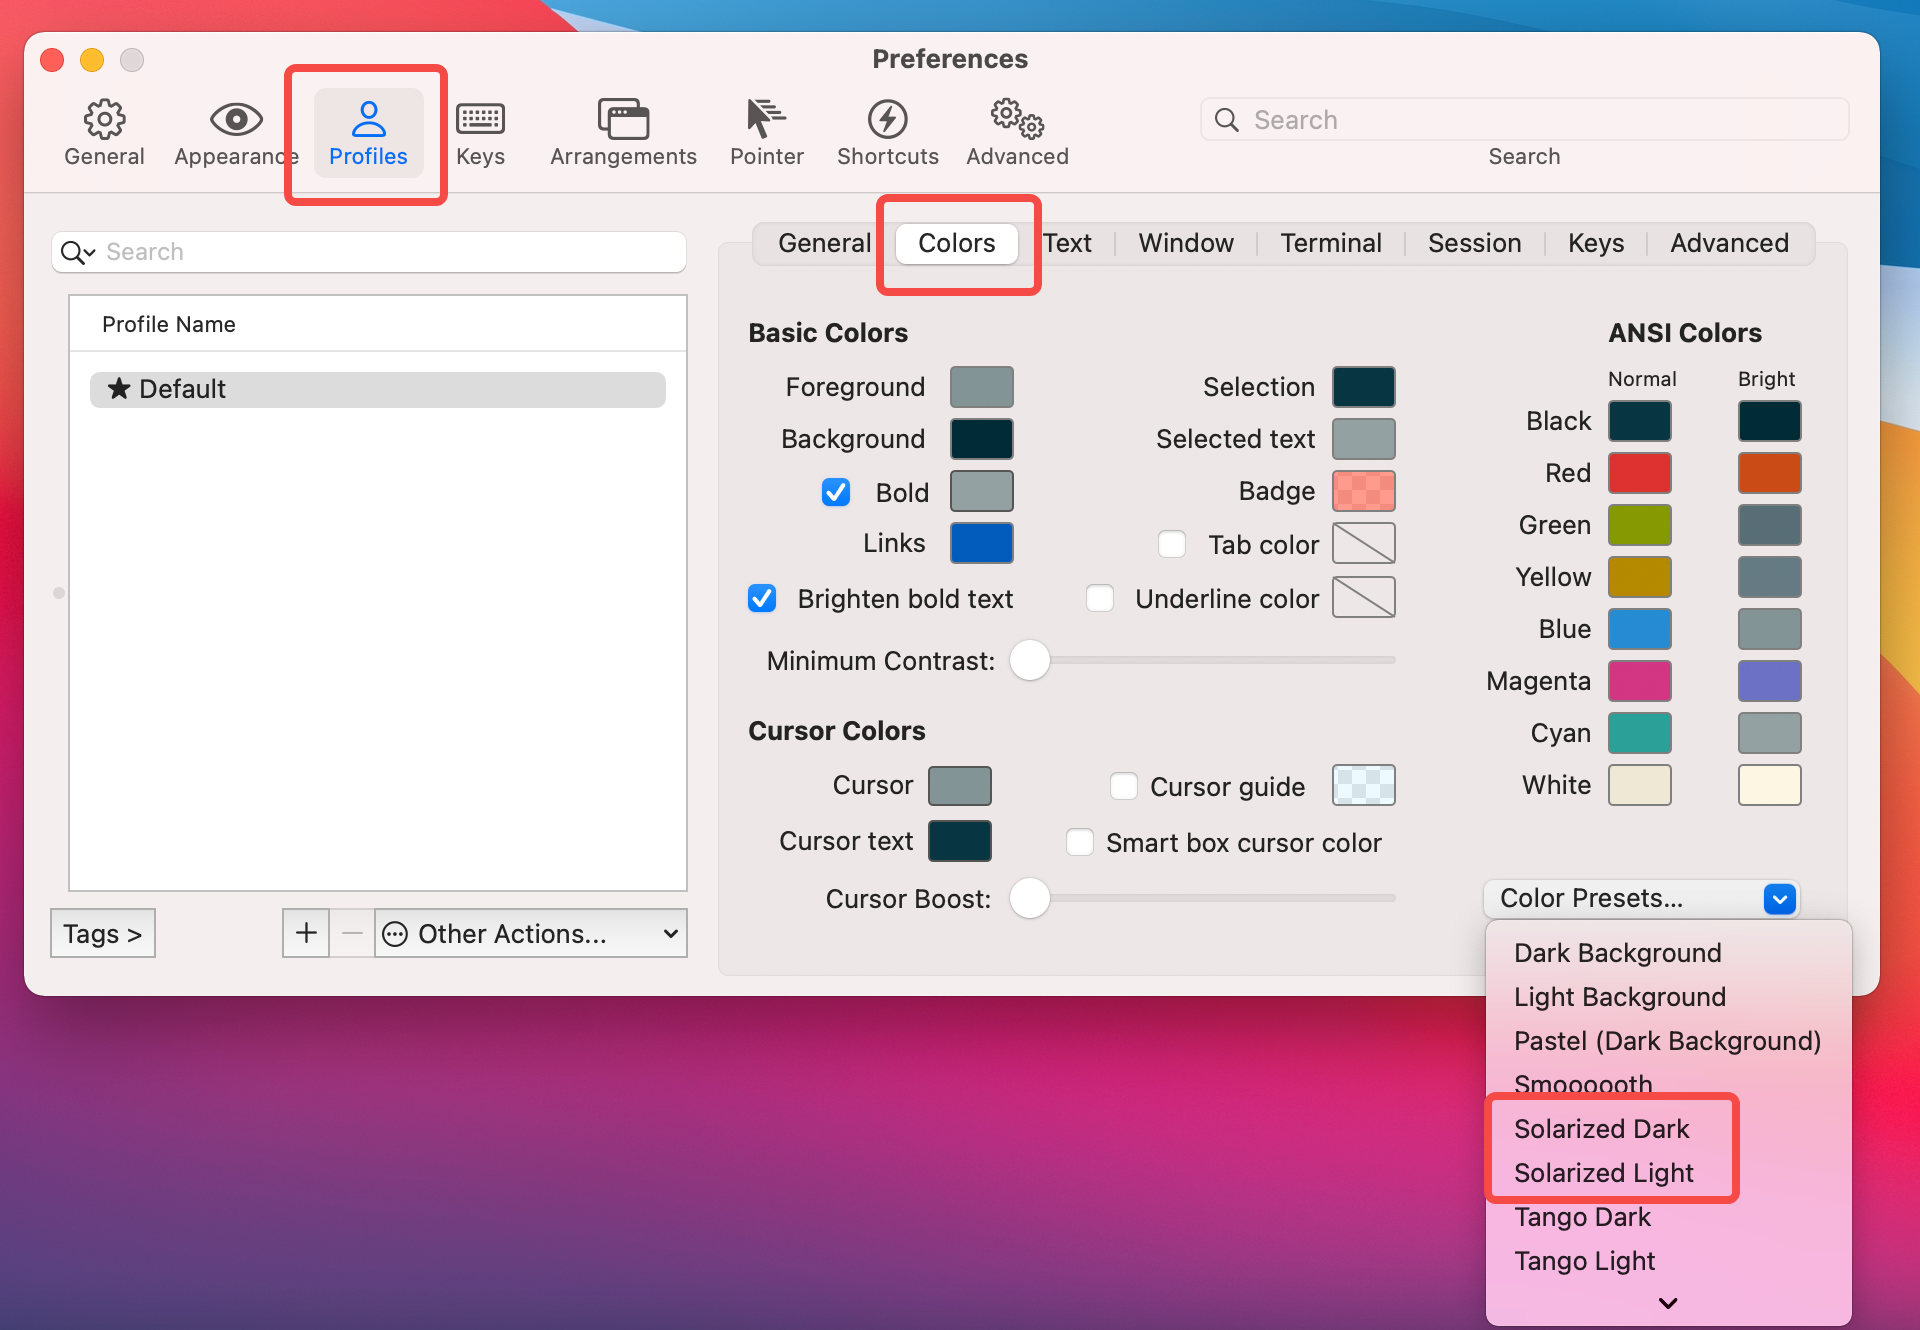
步骤6:安装配色方案solarized
1 | git clone https://github.com/altercation/solarized.git --depth 1 |
上面的open命令会弹出finder,然后在弹出的finder中,双击Solarized Dark.itermcolors以及Solarized Light.itermcolors便可将配色方案安装到iterm2中
然后在iterm2中选择该配色方案即可:Preferences -> Profiles -> Colors
步骤7:安装agnoster主题
1 | git clone https://github.com/fcamblor/oh-my-zsh-agnoster-fcamblor.git --depth 1 |
这些主题会被安装到~/.oh-my-zsh/themes目录下,然后修改~/.zshrc文件,将ZSH_THEME配置项的值改成agnoster
如果你选择了白色背景的话,agnoster也需要进行一些调整(2025-02-12之前)
~/.zshrc增加配置项SOLARIZED_THEME="light"~/.oh-my-zsh/themes/agnoster.zsh-theme修改背景- 找到关键词
build_prompt,这就是命令提示符的全部构成,每一个配置项的颜色都可以单独调整 - 以
prompt_context和prompt_status为例(我只改了这两个的颜色),将prompt_segment后面接的black改为white
1
2
3
4
5
6
7
8
9
10
11
12
13
14
15prompt_context() {
if [[ "$USERNAME" != "$DEFAULT_USER" || -n "$SSH_CLIENT" ]]; then
prompt_segment white default "%(!.%{%F{yellow}%}.)%n@%m"
fi
}
prompt_status() {
local -a symbols
[[ $RETVAL -ne 0 ]] && symbols+="%{%F{red}%}✘"
[[ $UID -eq 0 ]] && symbols+="%{%F{yellow}%}⚡"
[[ $(jobs -l | wc -l) -gt 0 ]] && symbols+="%{%F{cyan}%}⚙"
[[ -n "$symbols" ]] && prompt_segment white default "$symbols"
}- 找到关键词
如果你选择了白色背景的话,agnoster也需要进行一些调整(2025-02-12之后)
~/.zshrc增加配置项SOLARIZED_THEME="light"~/.oh-my-zsh/themes/agnoster.zsh-theme修改背景${AGNOSTER_CONTEXT_BG:=black}->${AGNOSTER_CONTEXT_BG:=white}${AGNOSTER_STATUS_BG:=black}->${AGNOSTER_STATUS_BG:=white}
~/.oh-my-zsh/themes/agnoster.zsh-theme:
prompt_status:提示信息,包括命令是否执行失败;当前是否为root用户等等
步骤8:安装zsh-syntax-highlighting用于高亮指令
1 | git clone https://github.com/zsh-users/zsh-syntax-highlighting.git --depth 1 ~/.oh-my-zsh/custom/plugins/zsh-syntax-highlighting |
然后修改~/.zshrc文件,修改配置项plugins,添加zsh-syntax-highlighting
1 | plugins=(<原有插件> zsh-syntax-highlighting) |
步骤9:安装zsh-autosuggestions用于指令提示
1 | git clone https://github.com/zsh-users/zsh-autosuggestions.git --depth 1 ~/.oh-my-zsh/custom/plugins/zsh-autosuggestions |
然后修改~/.zshrc文件,修改配置项plugins,添加zsh-autosuggestions
1 | ZSH_AUTOSUGGEST_HIGHLIGHT_STYLE='fg=red,bold' |
如果在iterm2中通过ssh访问远程主机,也想获得上述效果,那么需要在远程主机上执行如下几个步骤:
- 步骤2
- 步骤7
- 步骤8
- 步骤9
4.1.1 Tips
- 登录时,命令行提示符显式的是
~,但是执行cd后,显示的目录是用户目录的绝对路径,比如/home/test。这是因为HOME变量设置有问题,该变量最后不能有/符号,否则在将主目录替换成~的时候就会替换失败
4.1.2 Fonts
4.2 常用配置
- 光标形状
Preferences->Profile->Text->Cursor
4.3 Alt + f/b在ssh场景下失效
bash默认使用emacs模式,在该模式下,光标按单词移动的快捷键是Alt + b以及Alt + f,但是mac是没有这两个快捷键的,可以通过设置profile来解决这个问题,步骤如下:
Preferences->Profiles->Keys->Key Mappings->+:新建快捷键Alt + b的替代快捷键Shortcut:⌥←Action:选择Send Escape Sequence,填b
Alt + f的替代快捷键Shortcut:⌥→Action:选择Send Escape Sequence,填f
4.4 Ctrl + c失效
有时候(不明确复现路径是什么),在终端中,按下Ctrl + c,不会终止当前程序,而是在屏幕上输出9;5u,切伴随着响铃,在终端最上面会出现一个🔔的图标。可以按下面的步骤消除该问题:
Preferences->Profiles->TerminalNotification Center Alters:取消勾选Show bell icon in tabs:取消勾选
5 Karabiner-elements
外接如Filco的键盘,需要将win以及alt这两个键位进行交换。其中win对应command键,alt对应option键
Keys in pc keyboards - application->Modifier keys - fnModifier keys left_command->Modifier keys left_optionModifier keys left_option->Modifier keys left_command
6 FAQ
6.1 VirtualBox(rc=-1908)
解决方式如下(请挨个尝试):
方法1:
1 | sudo "/Library/Application Support/VirtualBox/LaunchDaemons/VirtualBoxStartup.sh" restart |
方法2:
1 | sudo kextload -b org.virtualbox.kext.VBoxDrv |
方法3:
1 | 1. 进入恢复模式:重启,然后按住 ⌘ + R |
6.2 VirtualBox cannot enable nested VT-x/AMD-V
nested VT-x/AMD-V这个特性不开的话,如果在虚拟机里面安装了VirtualBox,那么这个VirtualBox只能安装32位的系统
Virtualbox enable nested vtx/amd-v greyed out
1 | VBoxManage modifyvm <vm-name> --nested-hw-virt on |
6.3 您没有权限来打开应用程序
1 | sudo xattr -r -d com.apple.quarantine <app path> |
6.4 中文输入法卡顿
以下步骤可以解决Chrome中的卡顿问题(通用问题)
- 系统偏好设置->键盘
- 键盘:按键重复调到最快,重复前延迟调到最短
- 文本:所有的功能都关了,什么联想、提示之类的功能
以下步骤可以解决Chrome中的卡顿问题,参考How To Fix Input Lag And Slow Performance In Google Chrome
Chrome->Settings->Advanced->System-> DisableUse hardware acceleration when available- 开启或关闭可能都会有问题,重新切换一下开关状态可以恢复
以下步骤可以解决VSCode中的卡顿问题,参考Lagging/freezing using VSCode Insiders in Big Sur
1 | codesign --remove-signature /Applications/Visual\ Studio\ Code.app/Contents/Frameworks/Code\ Helper\ \(Renderer\).app |
以下步骤可以解决中文输入法卡顿的问题,参考程序开久了之后中文输入法卡顿,不知道怎么解决-Page2
- 系统偏好设置->调度中心
- 显示器具有单独的空间(取消该选项,取消后会导致其他问题,比如Dock无法跟随鼠标在两个屏幕之间切换)
6.5 滚动条总是自动隐藏
系统偏好设置 -> 通用 -> 选择始终显示滚动条
6.6 登录酒店 WIFI 无法弹出登录页面
如果使用了 Proxy SwitchyOmega 配置代理,那么默认新连接的 WIFI 也会带上相关的配置,需要通过如下方式手动删除掉:
System Settings -> Network -> Details -> Proxies
6.7 配置开机自启动
14.x及以上版本:搜索Login Items
6.8 快速黑屏
1 | pmset displaysleepnow |
6.9 右上角菜单栏如何显示蓝牙/音量等等
这些配置都在控制中心里面,即Control Center
6.10 Finder 默认搜索当前文件夹
Finder -> Settings-> Advanced -> When performing a search
6.11 阻止进入睡眠状态
1 | caffeinate -d |
6.12 外接键盘F1-F12不作为功能键
Keyboard -> Keyboard Shortcuts -> Function Keys -> Use F1, F12, etc. keys as standard function keys
6.13 禁止iCloud设备之间的联动
Search key word handoff
7 参考
- Mac 下利用 Launchctl 自启动 mysql
- Mac 有哪些鲜为人知的使用技巧?
- Mac下刻录ISO到U盘
- mac下vim的16种配色方案(代码高亮)展示,及配置
- mac终端(Terminal)字体颜色更改教程 [ls、vim操作颜色] [复制链接]
- iterm2有什么酷功能?
- 如何在OS X iTerm2中愉快地使用“⌥ ←”及“⌥→ ”快捷键跳过单词?
- iTerm 2 && Oh My Zsh【DIY教程——亲身体验过程】
- 更换Homebrew的更新源
- VirtualBox 在 macOS 出現 Kernel driver not installed 問題解決方式
- macOS Catalina/Big Sur 无法打开app,提示“因为无法确认开发者身份”问题的解决方法
- macOS 10.15 不能打开软件提示无法打开“app”