阅读更多
1 环境
IDEAMaven3.3.9
2 创建Webapp项目
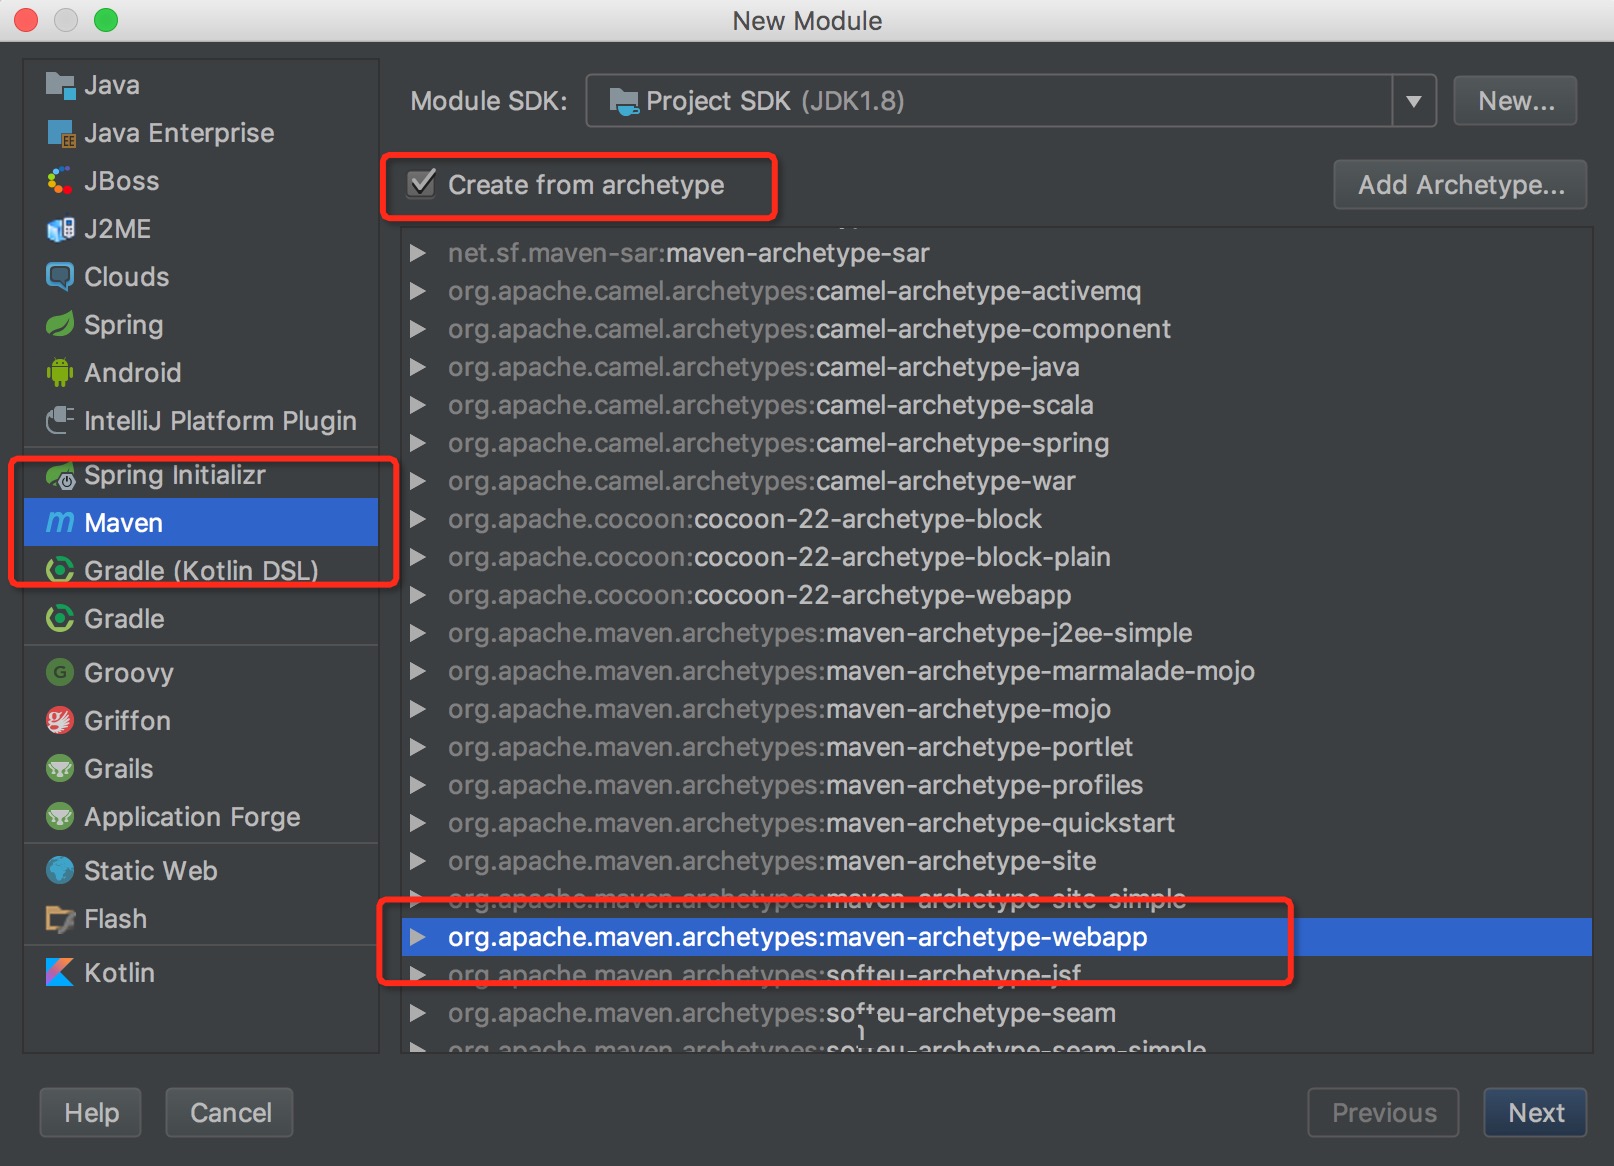
创建Project或者Module,利用Maven插件(maven-archtype-plugin)创建webapp项目的项目骨架,如下图所示
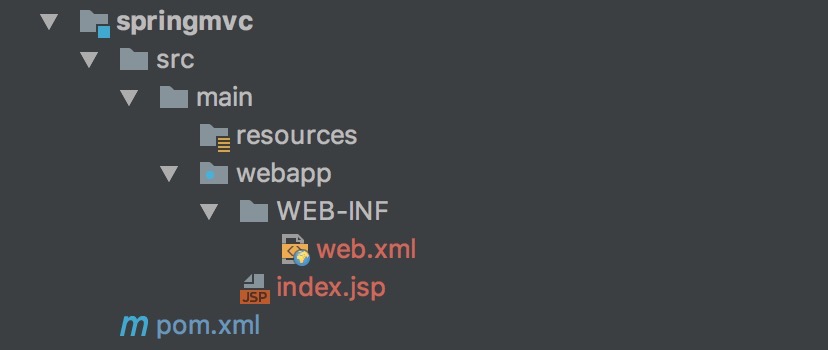
创建完毕之后,目录结构图如下图所示
生成的web.xml如下
1
2
3
4
5
6
7
8
| <!DOCTYPE web-app PUBLIC
"-//Sun Microsystems, Inc.//DTD Web Application 2.3//EN"
"http://java.sun.com/dtd/web-app_2_3.dtd" >
<web-app>
<display-name>Archetype Created Web Application</display-name>
</web-app>
|
生成的index.jsp如下
1
2
3
4
5
| <html>
<body>
<h2>Hello World!</h2>
</body>
</html>
|
3 web.xml文件
编写web.xml,修改为如下内容
1
2
3
4
5
6
7
8
9
10
11
12
13
14
15
16
17
18
19
20
21
22
23
24
25
26
27
28
29
30
31
| <!DOCTYPE web-app PUBLIC
"-//Sun Microsystems, Inc.//DTD Web Application 2.3//EN"
"http://java.sun.com/dtd/web-app_2_3.dtd" >
<web-app>
<display-name>Archetype Created Web Application</display-name>
<context-param>
<param-name>contextConfigLocation</param-name>
<param-value>/WEB-INF/applicationContext.xml</param-value>
</context-param>
<listener>
<listener-class>org.springframework.web.context.ContextLoaderListener</listener-class>
</listener>
<servlet>
<servlet-name>spring-mvc</servlet-name>
<servlet-class>org.springframework.web.servlet.DispatcherServlet</servlet-class>
<load-on-startup>1</load-on-startup>
</servlet>
<servlet-mapping>
<servlet-name>spring-mvc</servlet-name>
<url-pattern>/</url-pattern>
</servlet-mapping>
</web-app>
|
配置项含义解释如下:
- 在
(1)处,通过contextConfigLocation指定业务层Spring容器的配置文件(多个配置文件使用逗号分隔)
- 在
(2)处,ContextLoaderListener是一个ServletContextListener,它通过contextConfigLocation参数指定的Spring配置文件启动业务层的Spring容器
- 在
(3)处,配置了名为spring-mvc的DispatcherServlet,它默认自动加载/WEB-INF/spring-mvc-servlet.xml(默认格式为:<servlet-Name>-servlet.xml)的Spring配置文件,启动Web层的Spring容器
- 在
(4)处,通过<servlet-mapping>指定DispatcherServlet处理所有rest风格的HTTP请求
4 web.xml元素详解
<web-app>是web.xml的根元素,其子元素如下:
<icon>:指出IDE和GUI工具用来表示Web应用的一个和两个图像文件的位置<display-name>:提供GUI工具可能会用来标记这个特定的Web应用的一个名称<description>:给出与此有关的说明性文本<context-param>:声明应用范围内的初始化参数<filter>:将一个名字与一个实现javax.servlet.Filter接口的类相关联<filter-mapping>:一旦命名了一个过滤器,就要利用filter-mapping元素把它与一个或多个servlet或JSP页面相关联<listener>:对事件监听程序的支持,事件监听程序在建立、修改和删除会话或servlet环境时得到通知。listener元素指出事件的监听器类<servlet>:在向servlet或JSP页面制定初始化参数或定制URL时,必须首先命名servlet或JSP页面。servlet元素就是用来完成此项任务的<servlet-mapping>:服务器一般为servlet提供一个缺省的URL:http://host/webAppPrefix/servlet/ServletName。但是,常常会更改这个URL,以便servlet可以访问初始化参数或更容易地处理相对URL。在更改缺省URL时,使用servlet-mapping元素<session-config>:如果某个会话在一定时间内未被访问,服务器可以抛弃它以节省内存。可通过使用HttpSession的setMaxInactiveInterval方法明确设置单个会话对象的超时值,或者可利用session-config元素制定缺省超时值<mime-mapping>:如果Web应用具有想到特殊的文件,希望能保证给他们分配特定的MIME类型,则mime-mapping元素提供这种保证<welcome-file-list>:指示服务器在收到引用一个目录名而不是文件名的URL时,使用哪个文件<error-page>:使得在返回特定HTTP状态代码时,或者特定类型的异常被抛出时,能够指定将要显示的页面<resource-env-ref>:声明与资源相关的一个管理对象<resource-ref>:声明一个资源工厂使用的外部资源<security-constraint>:指定应该保护的URL。它与login-config元素联合使用<login-config>:指定服务器应该怎样给试图访问受保护页面的用户授权。它与sercurity-constraint元素联合使用<security-role>:给出安全角色的一个列表,这些角色将出现在servlet元素内的security-role-ref元素的role-name子元素中。分别地声明角色可使高级IDE处理安全信息更为容易<env-entry>:声明Web应用的环境项<ejb-ref>:声明一个EJB的主目录的引用<ejb-local-ref>:声明一个EJB的本地主目录的应用
5 编写pom文件
添加如下依赖
1
2
3
4
5
6
7
8
9
10
| <dependency>
<groupId>org.springframework</groupId>
<artifactId>spring-web</artifactId>
<version>4.3.13.RELEASE</version>
</dependency>
<dependency>
<groupId>org.springframework</groupId>
<artifactId>spring-webmvc</artifactId>
<version>4.3.13.RELEASE</version>
</dependency>
|
6 添加spring配置文件
在WEB-INF目录中,添加两个Spring配置文件分别为
- applicationContext.xml
- spring-mvc-servlet.xml
applicationContext.xml如下:
1
2
3
4
5
6
| <?xml version="1.0" encoding="UTF-8"?>
<beans xmlns="http://www.springframework.org/schema/beans"
xmlns:xsi="http://www.w3.org/2001/XMLSchema-instance"
xsi:schemaLocation="http://www.springframework.org/schema/beans http://www.springframework.org/schema/beans/spring-beans.xsd">
</beans>
|
spring-mvc-servlet.xml如下:
1
2
3
4
5
6
7
8
| <?xml version="1.0" encoding="UTF-8"?>
<beans xmlns="http://www.springframework.org/schema/beans"
xmlns:xsi="http://www.w3.org/2001/XMLSchema-instance"
xmlns:context="http://www.springframework.org/schema/context"
xsi:schemaLocation="http://www.springframework.org/schema/beans http://www.springframework.org/schema/beans/spring-beans.xsd http://www.springframework.org/schema/context http://www.springframework.org/schema/context/spring-context.xsd">
<context:component-scan base-package="org.liuyehcf.springmvc"/>
</beans>
|
7 编写Controller
这里就实现一个返回所有get请求参数的Controller
1
2
3
4
5
6
7
8
9
10
11
12
13
14
15
| package org.liuyehcf.springmvc;
import org.springframework.stereotype.Controller;
import org.springframework.web.bind.annotation.*;
@RequestMapping("/")
@Controller
public class SampleController {
@RequestMapping(value = "/{user}", method = RequestMethod.GET)
@ResponseBody
public String printGetMethodRequestParams(@PathVariable(value = "user") String user, @RequestParam(value = "age") Integer age) {
return "user: " + user + ", age: " + age;
}
}
|
注解解释
@RequestMapping:配置映射路径@Controller:@Component之一,用于配置Controller@ResponseBody:配置请求响应的映射关系@PathVariable:将URL中的占位符参数绑定到控制器处理方法的入参中@RequestParam:绑定请求参数值
8 运行
- IDEA配置tomcat启动该web应用
- 访问:
http://localhost:8080/test?age=1000
- 显示结果为:
user: test, age: 1000
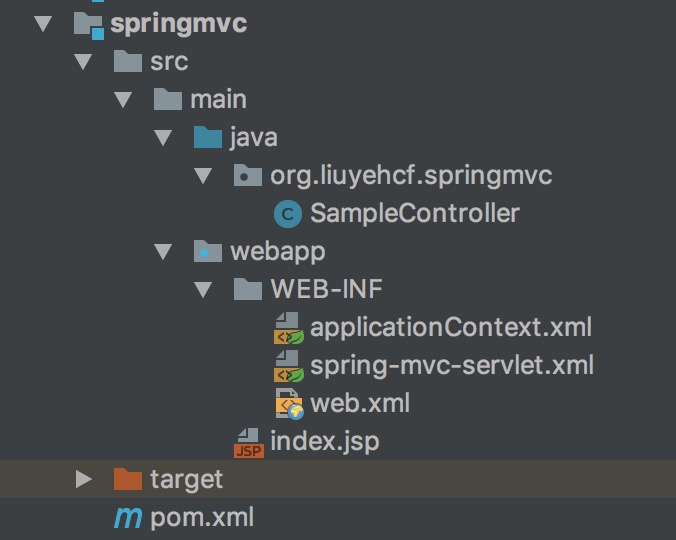
9 项目目录结构
最后,该Demo的项目目录结构如下
10 参考