阅读更多
1 namespace
该部分转载自DOCKER基础技术:LINUX NAMESPACE(上)、DOCKER基础技术:LINUX NAMESPACE(下)、Container Creation Using Namespaces and Bash
1.1 UTS
UTS(UNIX Time-sharing System) Namespace:用于隔离hostname与domain
1 |
|
1.2 IPC
IPC(Inter-Process Communication) Namespace:用于隔离进程间的通信方式,例如共享内存、信号量、消息队列等
1 |
|
1.3 PID
PID Namespace:用于隔离进程的PID
1 |
|
1.4 Mount
Mount Namespace:用于隔离文件系统
1 |
|
小插曲:mount -t proc proc /proc如何解释
-t参数后跟文件系统类型,这里指proc- 第二个
proc是设备名 - 第三个
/proc是挂载目录 - 对于proc文件系统来说,它没有设备,具体的内核代码如下,传什么设备名称都无所谓,因此好的实践是
mount -t proc nodev /proc
相关内核源码
1 | static struct dentry *proc_mount(struct file_system_type *fs_type, int flags, const char *dev_name, void *data) |
1.5 User
User Namespace:用于隔离user以及group
1 |
|
小插曲:笔者用的是centos7,该功能默认是关闭的,通过下面的方式可以打开
1 | # 该命令输出0,代表该功能尚未开启 |
1.6 Network
Network Namespace:用于隔离网络
1.6.1 Without Bridge
编写一个脚本,内容如下,这里我取名为netns_without_bridge.sh
1 |
|
下面进行测试
1 | # 执行脚本,将函数以及环境变量导出 |
1.6.2 With Bridge
编写一个脚本,内容如下,这里我取名为netns_with_bridge.sh
1 |
|
下面进行测试
1 | # 执行脚本,将函数以及环境变量导出 |
1.7 Implement Docker
该部分转载自Container Creation Using Namespaces and Bash
1.7.1 Terms
Container:容器是一组技术的集合,包括namespace、cgroup,在本小节,我们关注的重点是namespace
Namespace:包含六种namespace,包括PID、User、Net、Mnt、Uts、Ipc
Btrfs:Btrfs是一种采用Copy On Write模式的高效、易用的文件系统
1.7.2 Preparation
- 我们需要安装docker(安装docker即可)
- 需要使用docker导出某个镜像
- 使用docker自带的网桥
- 我们需要一个btrfs文件系统,挂载于/btrfs,下面会介绍如何创建(需要安装btrfs命令)
1.7.3 Detail Steps
1.7.3.1 Create Disk Image
1 | # 用dd命令创建一个2GB的空image(就是个文件) |
1.7.3.2 Format Disk Image
1 | # 利用 mkfs.btrfs 命令,将一个文件格式化成 btrfs 文件系统 |
1.7.3.3 Mount Disk Image
1 | # 将disk.img对应的文件系统挂载到/btrfs目录下 |
1.7.3.4 Invisible Image
1 | # 让接下来的步骤中容器执行的挂载操作对于外界不可见 |
1.7.3.5 Create Container Image
1 | # 进入文件系统 |
1.7.3.6 Test with chroot
1 | # 将 containers/tupperware/ 作为 /root,并执行/root/bin/sh(这里root就是指change之后的root) |
1.7.3.7 Use namespace
1 | # 以6种隔离维度执行bash命令 |
1.7.3.8 Mount proc
1 | # 挂载proc |
1.7.3.9 Pivot root
1 | # 接下来,利用 mount 命令以及 pivot_root 命令把 /btrfs/containers/tupperware 作为文件系统的根目录 |
1.7.3.10 Mountpoints
1 |
|
1.7.3.11 Network Namespace
以下命令,在容器终端执行(unshare创建的容器终端)
1 | ping 8.8.8.8 |
以下命令,在另一个终端执行(非上述unshare创建的容器终端)
1 |
|
以下命令,在容器终端执行(unshare创建的容器终端)
1 | ifconfig -a |
以下命令,在另一个终端执行(非上述unshare创建的容器终端)
1 | # 利用 ip link set 将网卡 c2204 关联到网桥 docker0 |
以下命令,在容器终端执行(unshare创建的容器终端)
1 | # 开启loopback网卡 |
1.7.4 Clean Up
1 | # 退出容器终端 |
1.8 Reference
- DOCKER基础技术:LINUX NAMESPACE(上)
- DOCKER基础技术:LINUX NAMESPACE(下)
- Container Creation Using Namespaces and Bash
- Netruon 理解(12):使用 Linux bridge 将 Linux network namespace 连接外网
2 cgroup
cgroup, similar to namespace, also groups processes, but its purpose differs from namespace. namespace is meant to isolate resources between process groups (each process has an isolated resource view), while cgroup is for unified resource monitoring and limitation for a group of processes.
2.1 hierarchy
A hierarchy can be understood as a cgroup tree, where each node in the tree represents a process group, and each tree is associated with zero or more subsystems. Within a single tree, all processes in the Linux system are included, but each process can belong to only one node (process group). There can be many cgroup trees in the system, each associated with different subsystems. A process can belong to multiple trees, meaning a process can belong to multiple process groups, but these process groups are associated with different subsystems. Currently, Linux supports 12 types of subsystems, and if we exclude cases where no subsystem is associated (such as systemd), Linux can have a maximum of 12 cgroup trees, each associated with one subsystem. Of course, it is also possible to create only one tree and associate it with all subsystems. When a cgroup tree is not associated with any subsystem, it means that this tree only groups processes, and what to do with these groups is left up to the application itself. systemd is an example of this kind of usage.
2.2 Subsystem
A subsystem is a kernel module that, once associated with a cgroup tree, performs specific actions on each node (process group) in the tree. Subsystems are often called resource controllers because they are mainly used to allocate or limit the resources of each process group. However, this term is not entirely accurate, as sometimes we group processes simply for monitoring purposes, such as the perf_event subsystem. So far, Linux supports 12 types of subsystems, for example, limiting CPU usage time, limiting memory usage, tracking CPU usage, freezing and resuming a group of processes, and so on. These subsystems will be introduced one by one later.
The following are the 12 cgroup subsystems
blkio: Limitscgroupblock deviceIOspeedscpu: Used to limitcgroupCPU usagecpuacct: TrackscgroupCPU usagecpuset: Bindscgroupto specifiedCPUsandNUMAnodesdevices: Limitscgrouppermissions for creating (viamknod) and accessing devicesfreezer:suspendandrestoreall processes in acgrouphugetlb: Limitscgroupuse of huge pagesmemory: Tracks and limitscgroupmemory usage, includingprocess memory,kernel memory, andswapnet_cls: Tags all network packets created by processes in acgroupwith aclassidfor use withtcandiptables. Only affects outgoing packets, not incoming onesnet_prio: Setscgroupaccess priority for each network interfaceperf_event: Monitors the performance of acgrouppids: Limits the total number of processes within acgroupand its descendantcgroups
You can check the subsystems supported by the system by running cat /proc/cgroups or mount -t cgroup.
2.2.1 CPU Subsystem
The cpu subsystem can control the amount of CPU access for cgroups. The following two schedulers can be used to manage access to CPU resources:
- Completely Fair Scheduler (CFS): A proportional allocation scheduler that distributes CPU time (CPU bandwidth) among
cgroupsproportionally based on task priority/weight or the share assigned to eachcgroup. - Real-Time Scheduler (RT): A task scheduler that limits the CPU usage time for real-time tasks.
We can control the upper limit of CPU usage through the parameters cpu.cfs_period_us and cpu.cfs_quota_us.
cpu.cfs_period_us: This parameter, in microseconds, defines the bandwidth (duration) of the CPU scheduling period.cpu.cfs_quota_us: This parameter, also in microseconds, defines the CPU bandwidth that can be used within one CPU scheduling period.
The ratio of cpu.cfs_quota_us to cpu.cfs_period_us represents the CPU usage ratio (it can be greater than 1, indicating the number of cores used in a multi-core machine). However, while maintaining the same ratio, the actual behavior of processes can also be affected by the value of cpu.cfs_period_us.
- If
cpu.cfs_period_usis very large, for example,1s, and the usage ratio is 20%, the process behavior may be full-load operation for the first0.2sand blocking for the following0.8s, resulting in a stronger sense of stalling. - If
cpu.cfs_period_usis very small, for example,10ms, and the usage ratio is 20%, the process behavior might be full-load operation for the first2msand blocking for the next8ms, giving a weaker sense of stalling and a relatively smoother experience.
Verification:
1 | # Terminal A |
We can use the parameters cpu.rt_period_us and cpu.rt_runtime_us to set CPU limits for specific tasks.
cpu.rt_period_us: This parameter, in microseconds, defines the period for reallocation of CPU resources within acgroupover a specified time frame.cpu.rt_runtime_us: This parameter, in microseconds, defines the maximum continuous CPU access time for tasks within acgroupduring a specified period (this limit is established to prevent tasks within onecgroupfrom monopolizing CPU time).
cpu.stat records CPU time statistics
nr_periods: The number of CPU scheduling periods that have passed.nr_throttled: The number of times tasks in thecgrouphave been throttled (prevented from running after exhausting all quota time).throttled_time: The total time tasks in thecgrouphave been throttled.
If we want to control the relative CPU time ratio between two cgroups, we can use cpu.shares. For example, if the first cgroup is set to 200 and the second to 100, then the former can access twice the CPU time of the latter.
When a process is added to a cgroup’s task list, any threads created by that process will automatically belong to this cgroup. In other words, previously created threads do not automatically belong to this cgroup!!!
2.3 Kernel Implementation
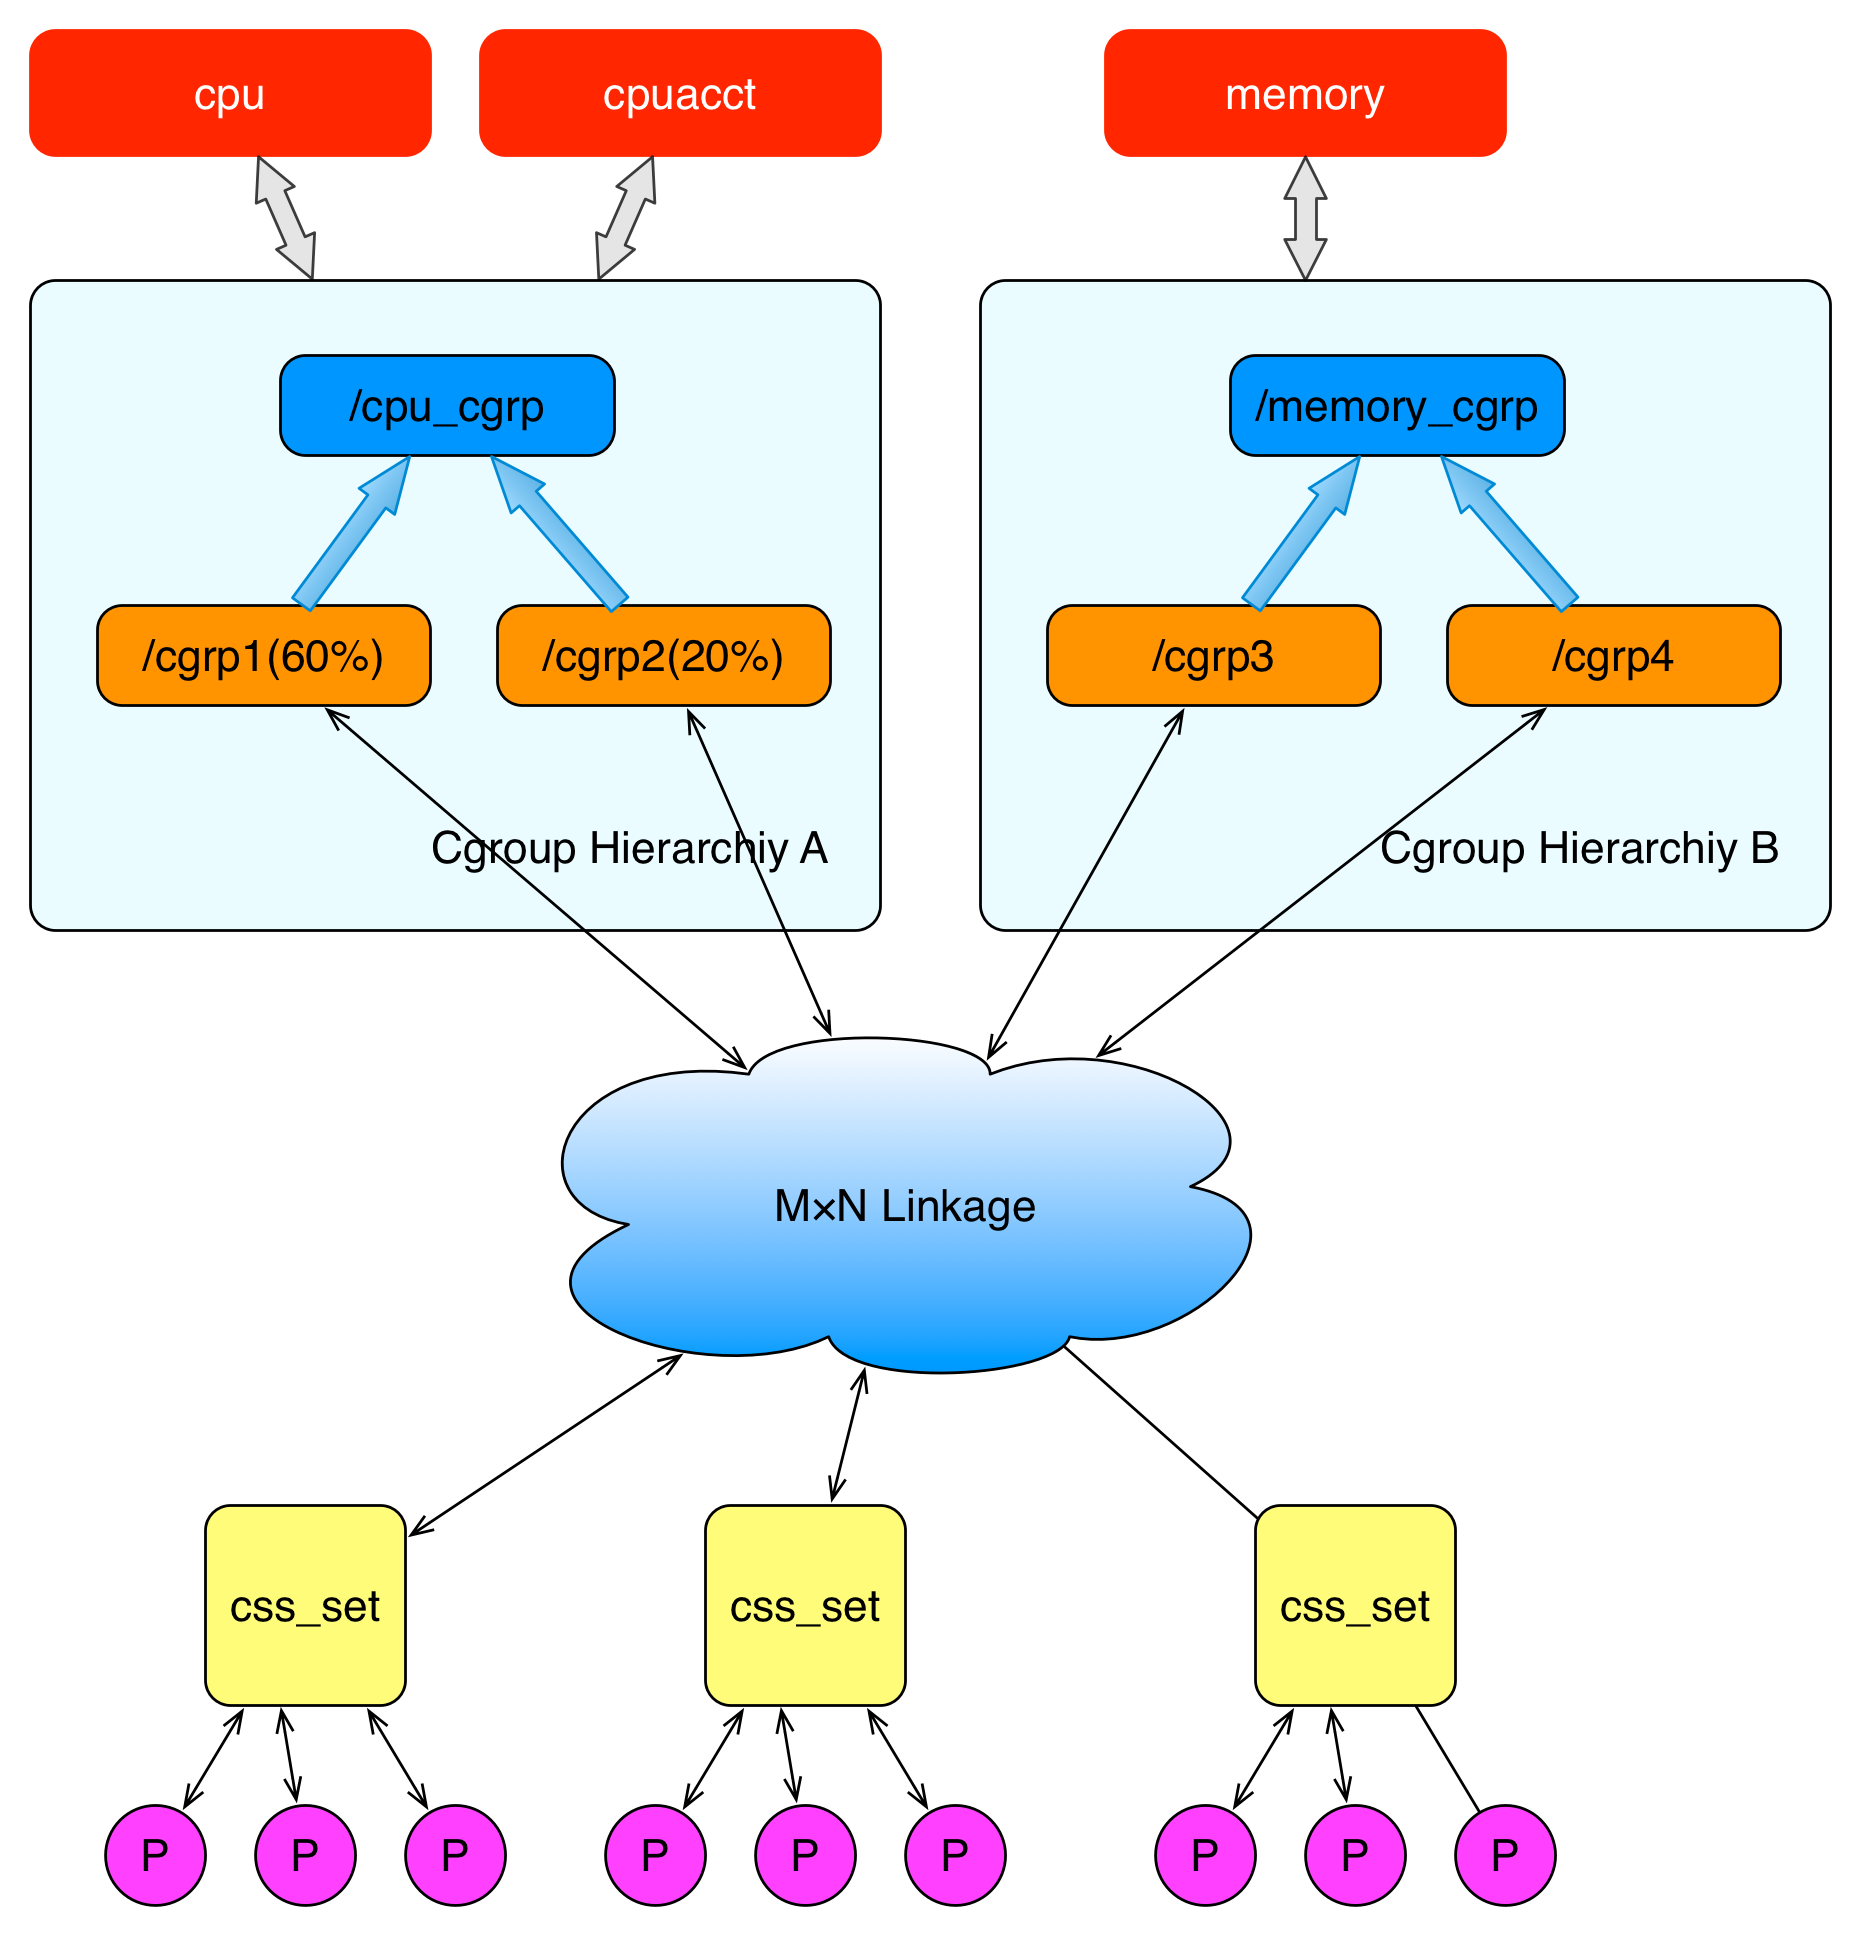
The diagram above describes the relationship between processes and cgroups in terms of overall structure. The P at the bottom represents a process. In each process descriptor, there is a pointer to an auxiliary data structure called css_set (cgroups subsystem set). Processes pointing to a specific css_set are added to the process list of that css_set. A process can only belong to one css_set, while a css_set can contain multiple processes. Processes within the same css_set are subject to the resource limits associated with that css_set.
The M×N Linkage in the diagram illustrates that css_set can be associated with nodes in the hierarchy structure through an auxiliary data structure in a many-to-many relationship. However, cgroup does not allow a css_set to be linked to multiple nodes within the same hierarchy, as cgroup does not permit multiple resource limit configurations for the same type of resource on the same group of processes.
When a css_set is associated with nodes across multiple hierarchies, it indicates that the processes in the current css_set need to be controlled for multiple resources. Conversely, when a node in a hierarchy is associated with multiple css_sets, it means that the process lists under these css_sets are subject to the same resource limitations.
1 | struct task_struct { |
2.4 docker and cgroup
cgroup driver:
system cgroup drivercgroupfs cgroup driver
2.5 kubernetes and cgroup
In Kubernetes, resources are limited at the pod level (making full use of the cgroup hierarchy), with the corresponding directory located at /sys/fs/cgroup/<resource type>/kubepods.slice.
2.6 cgroup Command Line
1 | yum install -y libcgroup libcgroup-tools |
Examples:
sudo cgcreate -g cpu,memory:/my_cgroup- Then config cgroup in path
/sys/fs/cgroup/my_cgroup
- Then config cgroup in path
sudo cgexec -g cpu,memory:/my_cgroup <command>
2.7 Cgroup2
Here are the key differences between cgroup v1 and cgroup v2:
- Unified Hierarchy:
- cgroup v1 allows multiple hierarchies, with different controllers mounted to separate hierarchies, which can create complexity and inconsistencies in resource limits.
- cgroup v2 uses a single unified hierarchy where all controllers are mounted together, simplifying management and resource allocation.
- Simplified Resource Distribution:
- In cgroup v1, each subsystem could have a different hierarchy, resulting in processes belonging to different cgroups across subsystems, complicating resource distribution.
- cgroup v2 enforces consistent resource distribution by having all controllers in the same hierarchy, ensuring that resources are allocated more predictably and effectively.
- Improved Resource Control:
- cgroup v2 offers enhanced features for CPU and I/O management, like the
io.weightattribute, which replaces the olderblkiosubsystem for I/O control. This allows finer-grained control over resources. - CPU throttling in cgroup v2 is managed by
cpu.maxinstead ofcpu.cfs_period_usandcpu.cfs_quota_usfrom cgroup v1, simplifying CPU limit configuration.
- cgroup v2 offers enhanced features for CPU and I/O management, like the
- Better Memory Management:
- cgroup v2 provides a single memory controller that combines
memoryandmemsw(swap) control, which in cgroup v1 were separate. This unified memory control simplifies memory management.
- cgroup v2 provides a single memory controller that combines
- Process Management Enhancements:
- cgroup v2 introduces the
cgroup.procsfile, which lists only the PIDs of the immediate child processes in each cgroup, while cgroup v1 usestasks, which includes all threads and child processes. - With cgroup v2, thread granularity is no longer supported directly, as all threads of a process belong to the same cgroup by default, making process management more straightforward.
- cgroup v2 introduces the
- Stricter Rules for Nested Control:
- In cgroup v2, child cgroups can inherit resource limits set by parent cgroups, enforcing stricter hierarchical resource control. This is beneficial for containerized environments like Kubernetes where resource limits are defined hierarchically.
- cgroup v1 does not enforce this as strictly, which can lead to misconfigurations and unexpected behavior in nested control.
- Compatibility and Adoption:
- cgroup v1 is still widely used for legacy applications, but cgroup v2 has become the default in many modern distributions, especially as container runtimes and orchestrators like Kubernetes adopt it for better resource control.
These enhancements make cgroup v2 more efficient and easier to use in modern resource-constrained environments, especially with containerized applications.
In cgroup v2, the CPU subsystem configuration is streamlined, offering a simplified way to control CPU resource allocation. Here are the main parameters used to configure CPU limits in cgroup2:
- cpu.max:
cpu.maxcontrols the maximum CPU bandwidth available to thecgroup.- It accepts two values:
quotaandperiod, formatted asquota period.quota: The maximum amount of time in microseconds that acgroupcan use CPU in each period. If set to “max”, there is no limit.period: The time window in microseconds for each quota cycle. The default is100000(100ms).
- Example:
echo "50000 100000" > /sys/fs/cgroup/<path>/cpu.max- This setting allows the
cgroupto use up to 50ms of CPU time in every 100ms period, effectively capping it at 50% CPU usage.
- This setting allows the
- cpu.weight:
cpu.weightspecifies the relative weight of CPU time thecgroupshould receive when compared to othercgroups.- It accepts values between
1and10000, with100as the default. A higher value gives thecgroupmore CPU time relative to othercgroupswith lower weights. - Example:
echo "200" > /sys/fs/cgroup/<path>/cpu.weight- This sets the
cgroupto have twice the default CPU share.
- This sets the
- cpu.pressure:
cpu.pressureprovides CPU pressure information, indicating how much CPU demand exceeds supply in thecgroup. It is a read-only metric that helps monitor how frequently tasks are waiting for CPU time.- It contains three values:
some: Percentage of time at least one task is delayed by CPU pressure.full: Percentage of time all tasks are delayed by CPU pressure.avg10,avg60,avg300: Average CPU pressure over 10, 60, and 300 seconds.
- Example:
cat /sys/fs/cgroup/<path>/cpu.pressure- This gives insight into CPU resource contention within the
cgroup.
- This gives insight into CPU resource contention within the
2.8 FAT
2.8.1 Will cpu subsystem limit cpu load as well?
The load average is calculated based on the number of tasks waiting for CPU time, but with cgroup limitations, the kernel scheduler keeps most of the threads in a throttled state, so they are not actively contending for CPU in a way that contributes significantly to system-wide load.
2.9 Reference
- 【docker 底层知识】cgroup 原理分析
- Linux Cgroup 入门教程:基本概念
- Linux Cgroup 入门教程:CPU
- Linux Cgroup 入门教程:内存
- Linux资源管理之cgroups简介
- Linux Cgroup浅析
- RedHat-资源管理指南
- DOCKER基础技术:LINUX CGROUP
- LINUX CGROUP总结
- clone-manpage
- Docker 背后的内核知识——cgroups 资源限制
- 理解Docker(4):Docker 容器使用 cgroups 限制资源使用
- kubernetes kubelet组件中cgroup的层层"戒备"
3 Systemd
本小节转载自Systemd 入门教程:命令篇
3.1 Overview
历史上,Linux的启动一直采用init进程,这种方法有两个缺点
- 一是启动时间长。
init进程是串行启动,只有前一个进程启动完,才会启动下一个进程 - 二是启动脚本复杂。
init进程只是执行启动脚本,不管其他事情。脚本需要自己处理各种情况,这往往使得脚本变得很长
Systemd就是为了解决这些问题而诞生的。它的设计目标是,为系统的启动和管理提供一套完整的解决方案
3.2 Unit
Systemd可以管理所有系统资源。不同的资源统称为Unit(单位),Unit一共分成12种
Service unit:系统服务Target unit:多个 Unit 构成的一个组- 启动计算机的时候,需要启动大量的
Unit。如果每一次启动,都要一一写明本次启动需要哪些Unit,显然非常不方便。Systemd的解决方案就是Target - 简单说,
Target就是一个Unit组,包含许多相关的Unit。启动某个Target的时候,Systemd就会启动里面所有的Unit。从这个意义上说,Target这个概念类似于“状态点”,启动某个Target就好比启动到某种状态 - 传统的
init启动模式里面,有RunLevel的概念,跟Target的作用很类似。不同的是,RunLevel是互斥的,不可能多个RunLevel同时启动,但是多个Target可以同时启动。
- 启动计算机的时候,需要启动大量的
Device Unit:硬件设备Mount Unit:文件系统的挂载点Automount Unit:自动挂载点Path Unit:文件或路径Scope Unit:不是由 Systemd 启动的外部进程Slice Unit:进程组Snapshot Unit:Systemd 快照,可以切回某个快照Socket Unit:进程间通信的 socketSwap Unit:swap 文件Timer Unit:定时器
每一个Unit都有一个配置文件,告诉Systemd怎么启动这个Unit。Systemd默认从目录/etc/systemd/system/读取配置文件。但是,里面存放的大部分文件都是符号链接,指向目录/usr/lib/systemd/system/,真正的配置文件存放在那个目录。systemctl enable命令用于在上面两个目录之间,建立符号链接关系。与之对应的,systemctl disable命令用于在两个目录之间,撤销符号链接关系,相当于撤销开机启动。配置文件的后缀名,就是该Unit的种类。如果省略,Systemd默认后缀名为.service
1 | systemctl enable demo-service.service |
systemctl list-unit-files这个命令会输出一个列表,这个列表显示每个配置文件的状态,一共有四种
enabled:已建立启动链接disabled:没建立启动链接static:该配置文件没有[Install]部分(无法执行),只能作为其他配置文件的依赖masked:该配置文件被禁止建立启动链接
- 注意,从配置文件的状态无法看出,该
Unit是否正在运行。若要查看Unit的运行状态,需要使用systemctl status命令
3.3 Config Format
systemctl cat可以查看配置文件的内容,例如systemctl cat sshd.service
一般来说,一个Unit的格式如下
1 | [Unit] |
[Unit]区块通常是配置文件的第一个区块,用来定义Unit的元数据,以及配置与其他Unit的关系。它的主要字段如下
Description:简短描述Documentation:文档地址Requires:当前Unit依赖的其他Unit,如果它们没有运行,当前Unit会启动失败Wants:与当前Unit配合的其他Unit,如果它们没有运行,当前Unit不会启动失败BindsTo:与Requires类似,它指定的Unit如果退出,会导致当前Unit停止运行Before:如果该字段指定的Unit也要启动,那么必须在当前Unit之后启动After:如果该字段指定的Unit也要启动,那么必须在当前Unit之前启动Conflicts:这里指定的Unit不能与当前Unit同时运行Condition...:当前Unit运行必须满足的条件,否则不会运行Assert...:当前Unit运行必须满足的条件,否则会报启动失败
[Service]区块定义如何启动当前Service(只有Service类型的Unit才有这个区块)。它的主要字段如下
-
Type:定义启动时的进程行为。它有以下几种值。simple:默认值,执行ExecStart指定的命令,启动主进程forking:以fork方式从父进程创建子进程,创建后父进程会立即退出oneshot:一次性进程,Systemd会等当前服务退出,再继续往下执行dbus:当前服务通过D-Bus启动notify:当前服务启动完毕,会通知Systemd,再继续往下执行idle:若有其他任务执行完毕,当前服务才会运行
-
ExecStart:启动当前服务的命令 -
ExecStartPre:启动当前服务之前执行的命令 -
ExecStartPost:启动当前服务之后执行的命令 -
ExecReload:重启当前服务时执行的命令 -
ExecStop:停止当前服务时执行的命令 -
ExecStopPost:停止当其服务之后执行的命令 -
RestartSec:自动重启当前服务间隔的秒数 -
Restart:定义何种情况Systemd会自动重启当前服务,可能的值包括always:总是重启on-successon-failureon-abnormalon-aborton-watchdog
-
TimeoutSec:定义Systemd停止当前服务之前等待的秒数 -
Environment:指定环境变量Environment="VAR1=xxx" "VAR2=true" "VAR3=yyy":可以同时指定多个- 或者写多个
Environment配置1
2
3Environment="VAR1=xxx"
Environment="VAR2=true"
Environment="VAR3=yyy"
-
PrivateTmp:是否拥有私有的/tmp目录
[Install]区块,定义如何安装这个配置文件,即怎样做到开机启动
WantedBy:表示该配置所在的TargetTarget的含义是服务组,表示一组服务。WantedBy=multi-user.target指的是,sshd所在的Target是multi-user.target。这个设置非常重要,因为执行systemctl enable sshd.service命令时,sshd.service的一个符号链接,就会放在/etc/systemd/system目录下面的multi-user.target.wants子目录之中
完整的配置项清单参考systemd.unit — Unit configuration
3.4 Command Line
3.4.1 systemctl
systemctl start xxx.servicesystemctl stop xxx.servicesystemctl enable xxx.servicesystemctl disable xxx.servicesystemctl status xxx.servicesystemctl status <pid>systemctl restart xxx.servicesystemctl reload xxx.servicesystemctl list-units --type=service: List all services.systemctl daemon-reload: Reload unit config.systemctl show xxx.service: Show all properties.systemctl show xxx.service --property=ActiveStatesystemctl show xxx.service --property=MainPID
systemctl set-default xxx.target: Set default run level. Similar toCentOS 6.x run levelpoweroff.target:对应level-0rescue.target:对应level-1multi-user.target:对应level-2/3/4graphical.target:对应level-5reboot.target:对应level-6
systemctl get-default
3.4.2 journalctl
journalctl -u xxx.servicejournalctl -u xxx.service -n 100journalctl -u xxx.service -f
journalctl --vacuum-time=2d: Removes archived journal files older than the specified timespan. Accepts the usuals(default),m,h,days,months,weeksandyearssuffixes.journalctl --vacuum-size=500M: Removes the oldest archived journal files until the disk space they use falls below the specified size. Accepts the usualK,M,GandTsuffixes (to the base of1024).
3.5 User Service Manager
特点:
- 用户级服务:针对单个用户的服务,这些服务在用户登录时启动,退出登录时停止
- 权限:运行在用户级别的服务通常不需要(也不应该)超级用户权限
- 作用域:只影响启动这些服务的特定用户
- 配置文件位置:用户级服务的配置文件通常位于用户的
~/.config/systemd/user/目录 - 用途:用户特定的应用程序、开发工具、个人软件实例等
示例:只要加上--user即可,其他用法均类似
systemctl --user daemon-reloadsystemctl --user statussystemctl --user start xxx.service
3.6 demo
下面写了一个非常简单的程序(文件名为demo-service.c):接受并处理1、2、15三种信号
SIGHUP(1):打印日志,模拟加载配置文件SIGINT(2):打印日志,以错误码1结束进程SIGTERM(15):打印日志,以错误码0结束进程
1 |
|
接下来将它注册到systemd中
文件路径:/usr/lib/systemd/system/demo-service.service
1 | [Unit] |
测试
1 | # 编译 |
3.7 Reference
- Systemd 入门教程:命令篇
- Systemd 入门教程:实战篇
- 最简明扼要的 Systemd 教程,只需十分钟
- systemd添加自定义系统服务设置自定义开机启动
- systemd创建自定义服务(Ubuntu)
- Use systemd to Start a Linux Service at Boot
- Play With Container Network Interface
- systemd forking vs simple?
4 SELinux
4.1 DAC
自主式存取控制(Discretionary Access Control, DAC)。基本上,就是依据程序的拥有者与文件资源的rwx权限来决定有无存取的能力
4.2 MAC
委任式存取控制(Mandatory Access Control, MAC)。MAC可以针对特定的程序与特定的文件资源来进行权限的控管。也就是说,即使你是root,那么在使用不同的程序时,你所能取得的权限并不一定是root,而得要看当时该程序的配置而定。如此一来,我们针对控制的『主体』变成了『程序』而不是用户。此外,这个主体程序也不能任意使用系统文件资源,因为每个文件资源也有针对该主体程序配置可取用的权限。如此一来,控制项目就细的多了。但整个系统程序那么多、文件那么多,一项一项控制可就没完没了。所以SELinux也提供一些默认的政策(Policy),并在该政策内提供多个守则(rule),让你可以选择是否激活该控制守则
4.3 SELinux Run Mode
SELinux是透过MAC的方式来控管程序,他控制的主体是程序,而目标则是该程序能否读取的『文件资源』
主体(Subject):SELinux主要想要管理的就是程序,因此你可以将『主体』跟process划上等号
目标(Object):主体程序能否存取的『目标资源』一般就是文件系统。因此这个目标项目可以等文件系统划上等号
政策(Policy):由於程序与文件数量庞大,因此SELinux会依据某些服务来制订基本的存取安全性政策。这些政策内还会有详细的守则(rule)来指定不同的服务开放某些资源的存取与否。SELinux提供两个主要的政策,分别是:
targeted:针对网络服务限制较多,针对本机限制较少,是默认的政策strict:完整的SELinux限制,限制方面较为严格- 建议使用默认的
targeted政策即可。
安全性本文(security context):我们刚刚谈到了主体、目标与政策面,但是主体能不能存取目标除了政策指定之外,主体与目标的安全性本文必须一致才能够顺利存取。这个安全性本文(security context)有点类似文件系统的rwx。安全性本文的内容与配置是非常重要的。如果配置错误,你的某些服务(主体程序)就无法存取文件系统(目标资源),当然就会一直出现『权限不符』的错误信息了
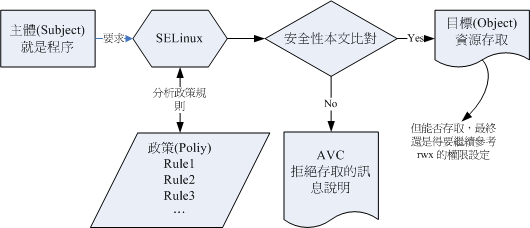
上图的重点在『主体』如何取得『目标』的资源存取权限。由上图我们可以发现,主体程序必须要通过SELinux政策内的守则放行后,就可以与目标资源进行安全性本文的比对,若比对失败则无法存取目标,若比对成功则可以开始存取目标。问题是,最终能否存取目标还是与文件系统的rwx权限配置有关
4.4 Security Context
安全性本文存在於主体程序中与目标文件资源中
- 程序在内存内,所以安全性本文可以存入是没问题
- 那文件的安全性本文是记录在哪里呢?事实上,安全性本文是放置到文件的
inode内的,因此主体程序想要读取目标文件资源时,同样需要读取inode,这inode内就可以比对安全性本文以及rwx等权限值是否正确,而给予适当的读取权限依据
安全性本文主要用冒号分为三个栏位,这三个栏位的意义为
- 身份识别(Identify):相当於帐号方面的身份识别。主要的身份识别则有底下三种常见的类型:
root:表示root的帐号身份system_u:表示系统程序方面的识别,通常就是程序user_u:代表的是一般使用者帐号相关的身份- 系统上面大部分的数据都会是
system_u或root - 如果是在
/home底下的数据,那么大部分应该就会是user_u
- 角色(Role):这个数据是属於程序、文件资源还是代表使用者。一般的角色有:
object_r:代表的是文件或目录等文件资源,这应该是最常见的system_r:代表的就是程序。不过,一般使用者也会被指定成为system_r喔
- 类型(Type):在默认的
targeted政策中,Identify与Role栏位基本上是不重要的。重要的在於这个类型(type)栏位。基本上,一个主体程序能不能读取到这个文件资源,与类型栏位有关,而类型栏位在文件与程序的定义不太相同,分别是type:在文件资源(Object)上面称为类型(Type)domain:在主体程序(Subject)则称为领域(domain)了domain需要与type搭配,则该程序才能够顺利的读取文件资源
4.5 Reference
5 cBPF vs. eBPF
概念:
cBPF, classic BPF, Berkeley Packet Filter:seccomp/tcpdump仍然在使用cBPF,但是在更新的版本上,通常会被转换成eBPF字节码再执行eBPF, extended BPF:具有更好的扩展性,更好的性能- 一般来说,
BPF就是指eBPF
- 一般来说,
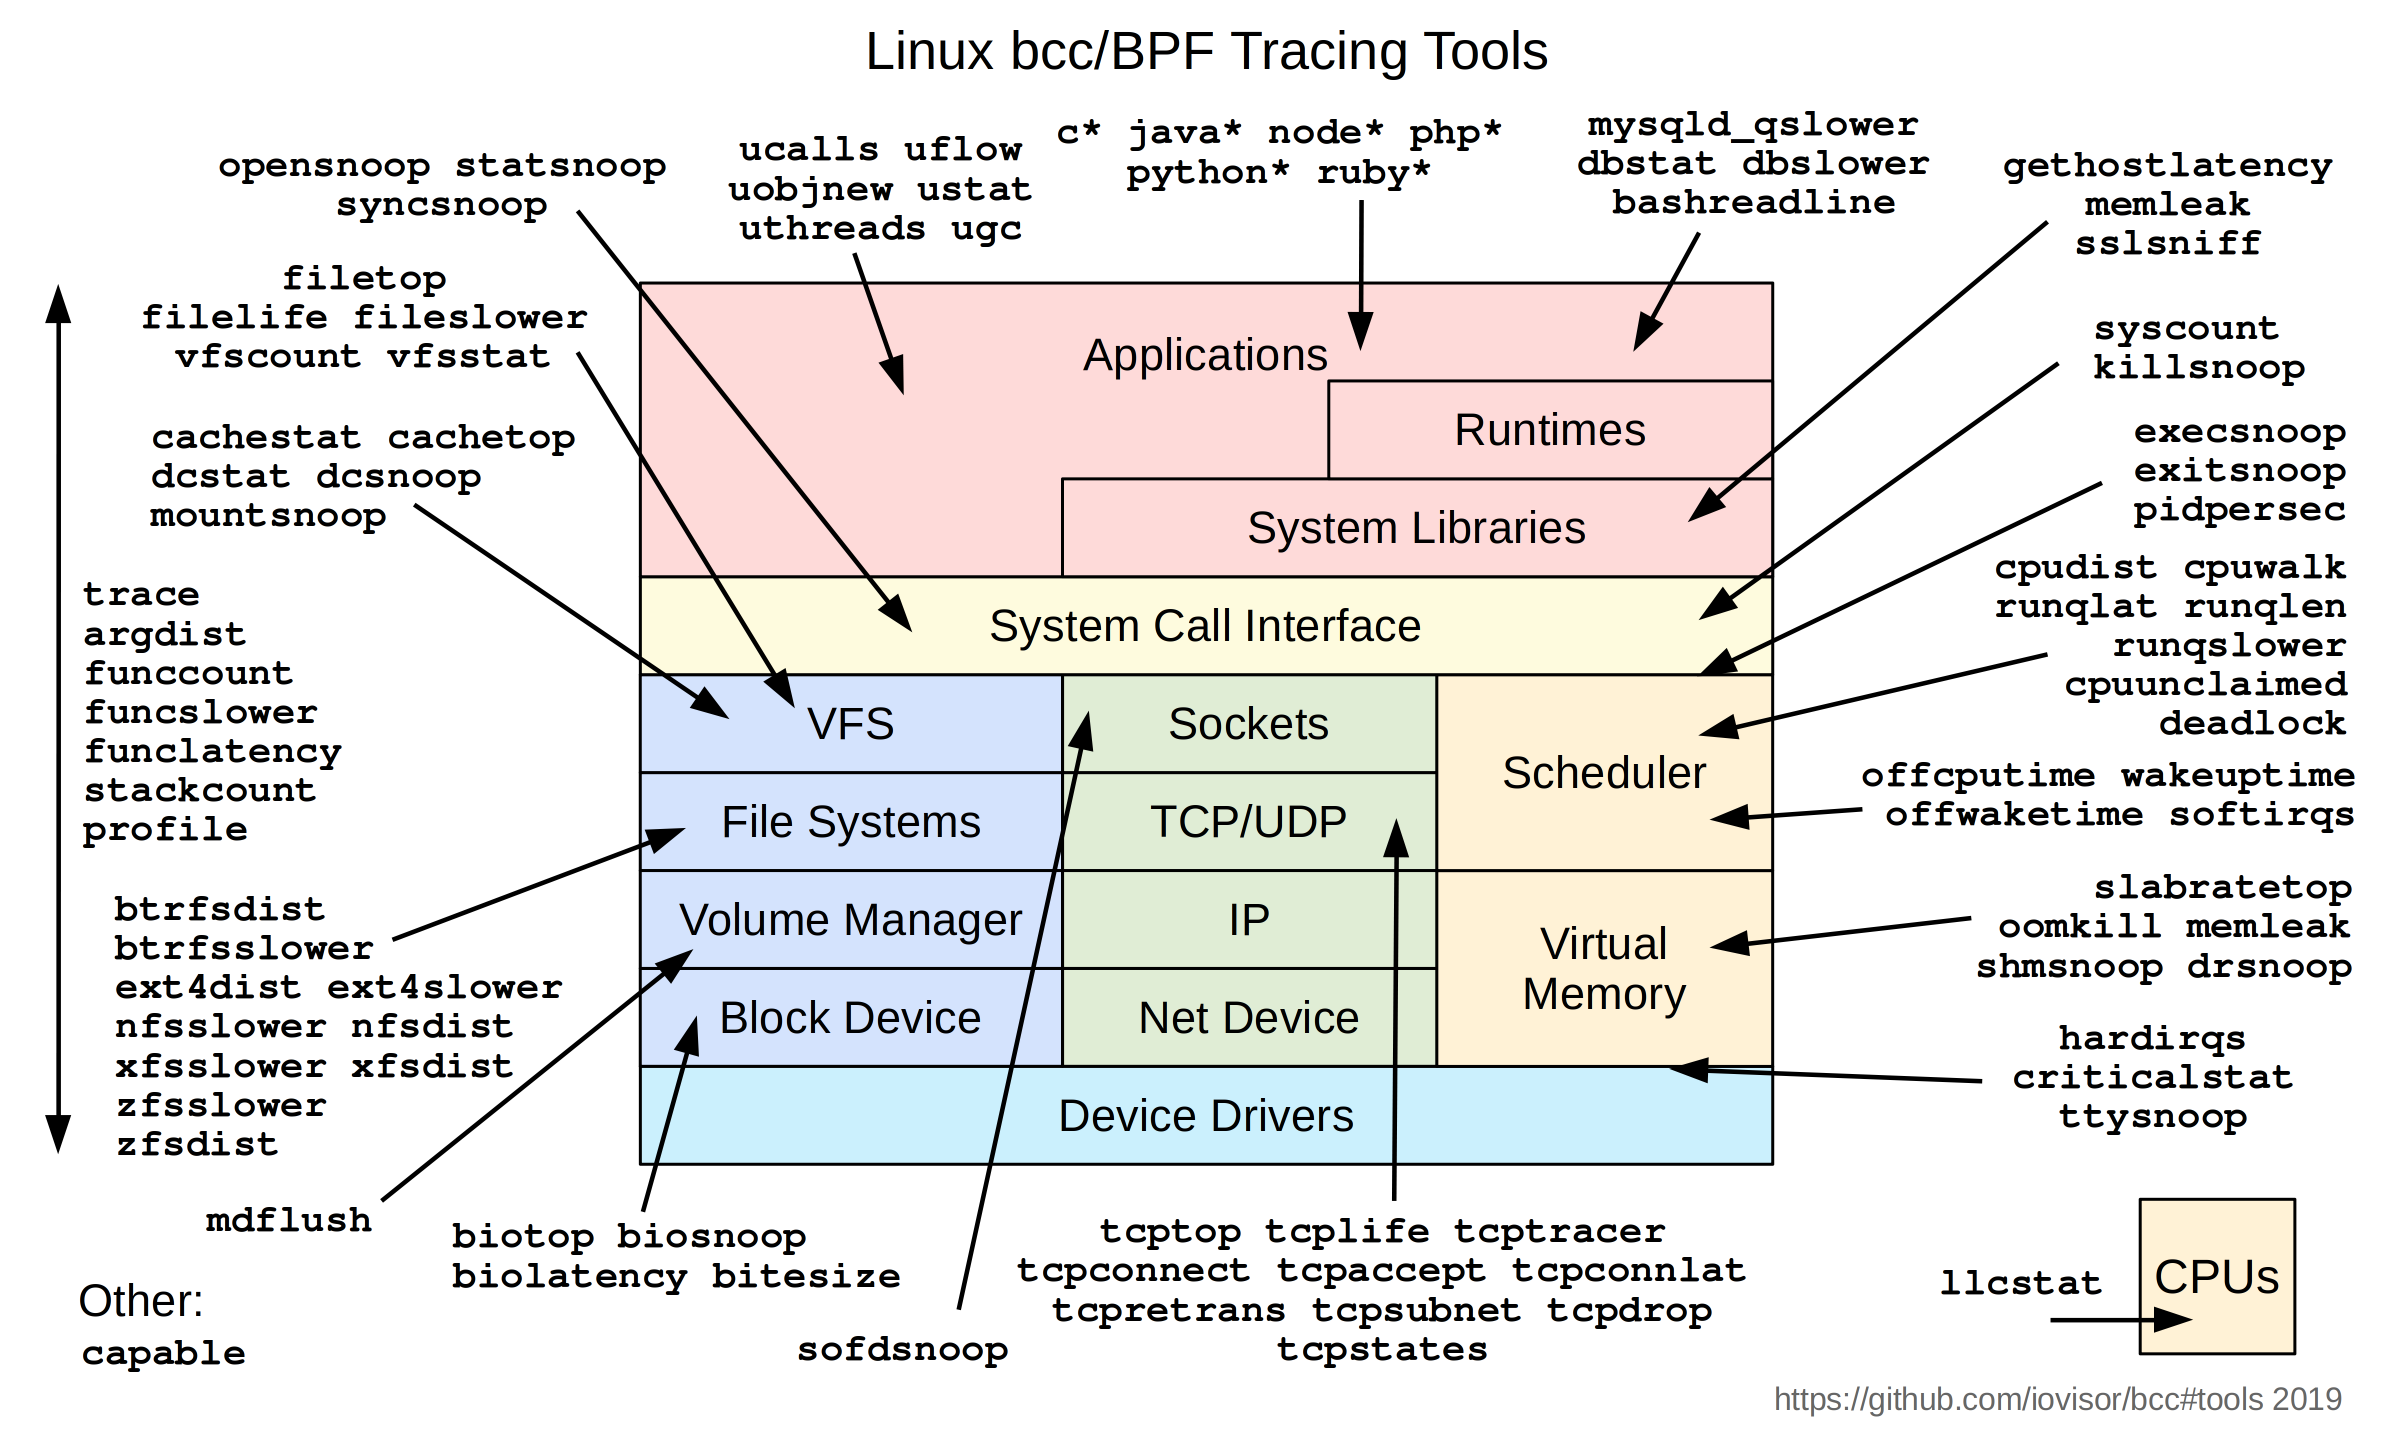
5.1 bcc
bcc, BPF Compiler Collection
下图是所有bcc包含的工具
5.2 bpftrace
5.3 Reference
6 Interrupt
6.1 Reference
- linux异常处理体系结构
- Linux的中断处理机制 [一] - 数据结构(1)
- Linux的中断处理机制 [二] - 数据结构(2)
- Linux的中断处理机制 [三] - hardirq
- Linux 中断
- Linux 内核中断内幕
- 彻底搞懂异常控制流
- 嵌入式杂谈之中断向量表
7 NUMA
NUMA(Non-Uniform Memory Access,非一致性内存访问)是一种计算机系统体系结构,用于解决多处理器系统中共享内存的问题。在NUMA架构中,系统内存被划分为多个节点(Node),每个节点有自己的内存和处理器。节点之间通过互联网络进行通信,进程可以在不同的节点上运行,并访问不同节点的内存。
NUMA相对于传统的SMP(Symmetric Multi-Processing,对称多处理)架构来说,可以提供更好的可扩展性和更高的性能。在SMP架构中,所有处理器共享一个全局内存,因此内存访问的延迟和带宽是一致的。但是在NUMA架构中,不同节点之间的内存访问延迟和带宽可能不同,这就需要程序员进行显式的内存分配和管理,以保证内存访问的局部性和性能
在NUMA架构中,操作系统和编译器需要提供支持,以便程序员可以使用NUMA相关的API和指令来控制内存分配和访问。例如,Linux提供了libnuma库和numactl工具,可以用于控制进程和内存的亲和性和绑定性,以及使用NUMA相关的系统调用和环境变量来进行内存分配和管理。在编译器层面,一些编译器可以通过特定的编译选项来生成NUMA意识的代码,以优化内存访问的性能和局部性